BABOR EXPERT METHOD
|
OVERVIEW OF THE TOPICS |
||||
|
4 |
||||
|
The BABOR EXPERT METHOD |
||||
|
Why is it so important? |
||||
|
The BABOR EXPERT METHOD in the treatment |
||||
|
2. |
7 |
|||
|
3. |
8 |
|||
|
4. |
9 |
|||
|
5. |
10 |
|||
|
6. |
12 |
|||
|
12 |
||||
|
With BABOR Sponges |
14 |
|||
|
7. |
16 |
|||
|
Face Sculpting Massage |
16 |
|||
|
Express Face Sculpting Massage |
21 |
|||
|
8. |
22 |
|||
|
|
BABOR EXPERT METHOD – the topics at a glance
The BABOR EXPERT METHOD encompasses sophisticated and professional treatment techniques. These techniques are based on scientific, derma-cosmetic, and massage & physiotherapeutic findings, and are used in all BABOR treatments.
It reinterprets traditional methods in a unique way through sensible, unusual combinations.
Alternating with skin-activating, deep application, and massage techniques are gentle stimulating methods specifically designed to promote tissue decongestion. Invigorating massage elements, activating in nature, contribute to a pleasantly relaxing sequence. They not only induce a state of relaxed vitality but also impart a distinctive sense of well-being.
At the same time, the BABOR EXPERT METHOD enables the effective integration of many treatment tools.
Deeply rooted in Henri Peter Ling‘s classic massage, inspired by Dr. Emil Vodder‘s manual lymphatic drainage, and the warm-cool hydrotherapy of Pastor Sebastian Kneipp, the individual elements of the BABOR EXPERT METHOD build on each other perfectly.
They create a unique endurance workout for the skin, introducing active ingredients from the BABOR products precisely into the skin layers. This approach allows the ingredients to unleash their maximum effectiveness, optimizing the benefits of the products for the skin.
Activated from the surface to the depths, the BABOR EXPERT METHOD supports skin health and gives the complexion radiance and youthfulness - the perfect basis for the effective action of the BABOR products individually selected for the treatment goal.
BABOR EXPERT METHOD: Achieving results that penetrate beneath the surface, providing an unparalleled sensation of vital, powerful skin ultimately nourished with BABOR.
WHY IS IT SO IMPORTANT?
The BABOR EXPERT METHOD…
- Underlines the high BABOR quality standard
- Guarantees the optimal effectiveness of each treatment, delivering immediate, visible, and noticeable results, as well as ensuring long-term benefits.
- Can be optimally individualized through the selection of BABOR products and the use of DEVICE tools
- Ensures the greatest possible tolerability of each treatment
- Provides well-being & relaxation during the treatment
- Can be adapted to every skin care requirement
- Makes every BABOR treatment unforgettable
- Ensures a high recognition value of BABOR treatments worldwide
INTERESTING FACTS IN ADVANCE
OVERVIEW - THE BABOR EXPERT METHOD IN THE TREATMENT
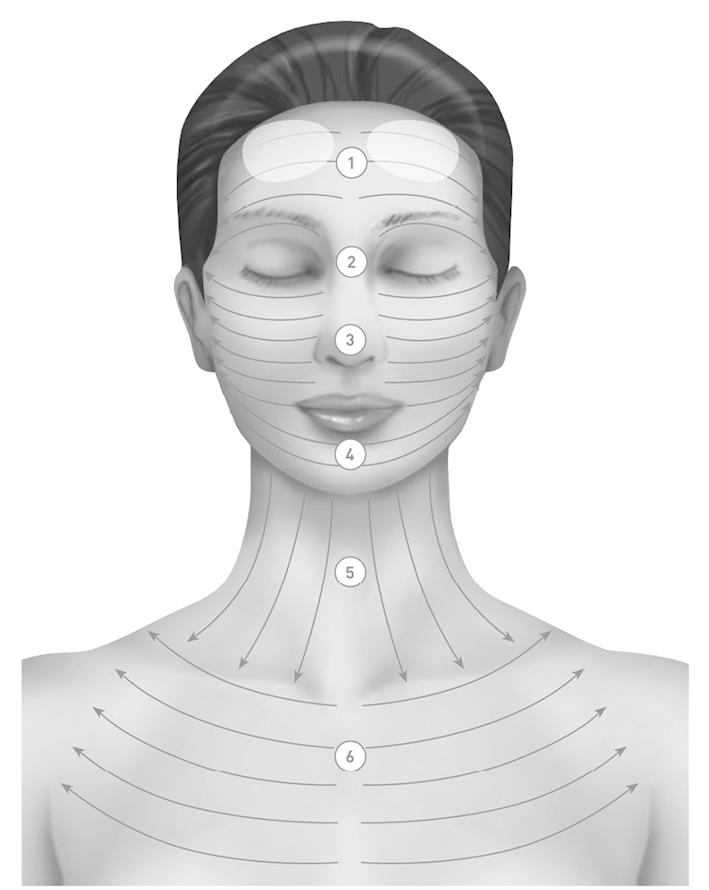
The treatment according to the BABOR EXPERT METHOD primarily covers the „large face“, including the neck and décolleté. Find below the following steps and elements involved.
The duration of each step varies based on the treatment goal and duration, with the flexibility to omit individual steps as needed.
|
Step |
Description |
|
EXPERT METHOD |
How? |
Why? |
|
|
1. |
Anamnesis/consultation & skin analysis |
With the BABOR Derma Visualizer |
→ Clarification of care/treatment goals |
|||
|
2. |
Welcome |
Grounding Ritual |
→ Relaxation & |
|||
|
3. |
Cleansing |
|
5 |
Deep Cleansing Ritual |
- Apply cleanser, work it into the skin and emulsify with cool water 3 times |
→ Increasing the skin‘s ability to absorb as the basis for optimal results → Recognize vital / less vital skin areas |
|
Hydro-Therapy-Stimulation |
- Remove with 2 warm compresses and finish with 1 cool compress |
||||
|
4. |
Supplementary manual and visual skin analysis |
|||||
|
5. |
Skin activation & vitality |
|
5 |
Vitality Analysis & Boost |
- Apply Skin Activator Gel (Rich Vitalizing Mask) with fan brush using application method |
|
|
Hydro-Therapy-Stimulation |
- Remove with 2 warm compresses and finish with 1 cool compress |
||||
|
6. |
Peeling & Toner |
|
5–25 |
Hydro-Therapy-Stimulation |
- Remove with 2 warm compresses and finish with 1 cool compress |
|
|
7. |
Ampoule Serum Concentrate / Active Concentrate / Serum |
|
4 |
Lymphatic Activation & Active Infusion – with hands |
- Perform following BABOR application |
→ Optimal absorption of active ingredients → Activation of lymph flow → Loosening of muscular hardening and connective tissue adhesions → Stimulation & training of connective tissue → Intensive feeling of well-being |
|
or |
||||||
|
Lymphatic Activation & Active Infusion – with BABOR Sponges |
|||||
|
8. |
Eye care |
2 |
- Apply generously & massage around eye area |
|||
|
9. |
Massage |
|
20 |
Face Sculpting Massage |
- Introduction - Muscular deep relaxation - Pressure point treatment - Decongestion of the tissue |
|
|
or |
||||||

|
10 |
Express Face Sculpting Massage |
- Introduction - Muscular deep relaxation - Decongestion of the tissue |
|||
|
10. |
Mask |
|
10–18 |
Hydro-Therapy-Stimulation bei Crememasken |
- Remove with 2 warm compresses and finish with 1 cool compress |
|
|
11. |
Final care |
1 |
- Apply eye care (50 minute treatment) & appropriate cream |
|||
|
12. |
Verabschiedung |
Reawakening Ritual |
→ Reactivation from the relaxation |
|||
|
13. |
Touch up with BABOR Make-up |
→ Achieve a flawless finish |
||||
|
14. |
Sales |
|||||
INTERESTING FACTS IN ADVANCE
INTERESTING FACTS IN ADVANCE
1. INTERESTING FACTS IN ADVANCEAv
MAKE OPTIMUM USE OF EXPOSURE TIMES
The BABOR EXPERT METHOD recommends making optimum use of the time while peels and / or masks are on the guest’s skin. This helps to increase the feeling of well-being.
Use the application times of Enzymatic or Chemical Peelings, e.g. for a relaxing scalp massage.
Use the application times of Masks, e.g. for a soothing hand massage.
Shoulder/neck massages can also be performed depending on the Peel / Mask applied.
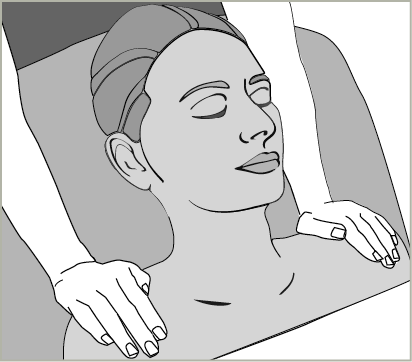
THE PERFECT INTRODUCTION TO TREATMENT
At the start of every BABOR treatment, the skilled professional immediately conveys to the guest that they are in very good hands. This assurance allows the guest to relax, trust in the expertise of BABOR, and fully unwind during the experience.
Why?
- First contact with the guest to convey trust, professionalism, and a sense of well-being
- Establishes a connection between the guest and the professional
- Relieves muscular tension in the chest & upper shoulder area
- Activates the lymphatic flow to decongest the tissue and improve the removal of metabolic waste products
- Allows the guest to arrive and relax
|
EXECUTION |
|
|
Step |
Description |
|
When? |
Immediately before the start of treatment |
|
How? |
In supine position Guide the guest to inhale and exhale |
|
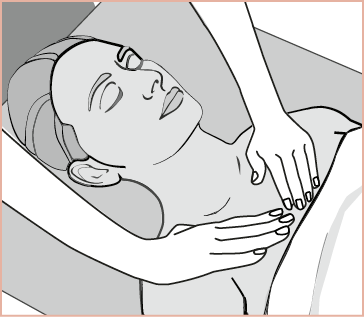
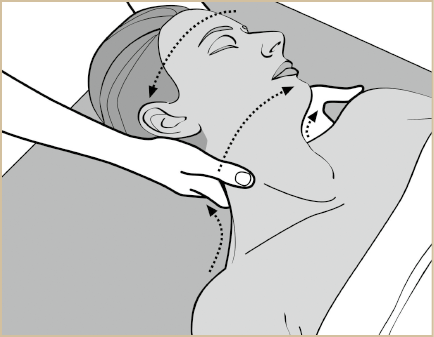
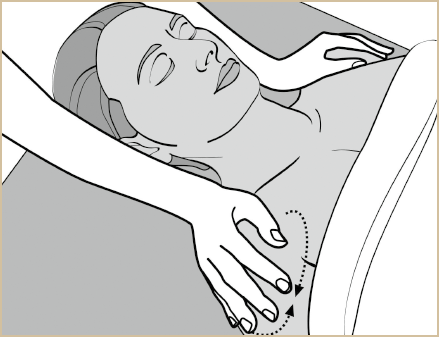
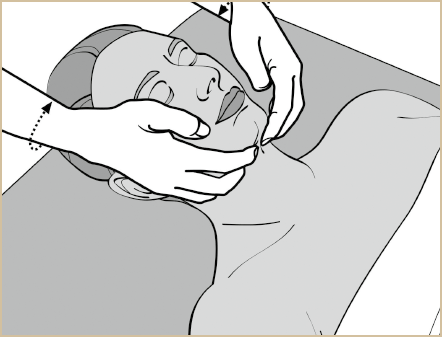
1. |
Place both hands flat on the décolleté. Allow the guest to breathe in deeply and apply gentle pressure with both hands as they breathe out. Release the pressure as they inhale. Perform 3 times. |
|
Why? To relieve tension in the chest and related upper shoulder muscles |
|
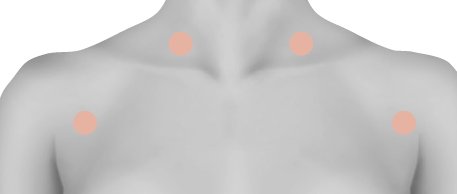
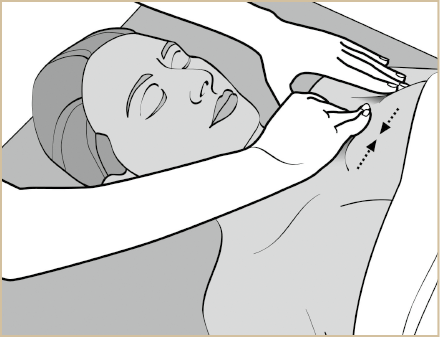
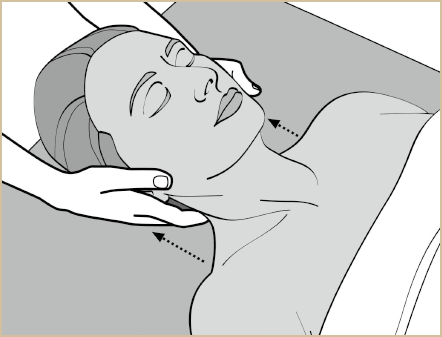
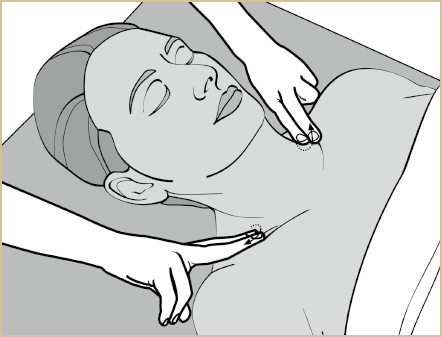
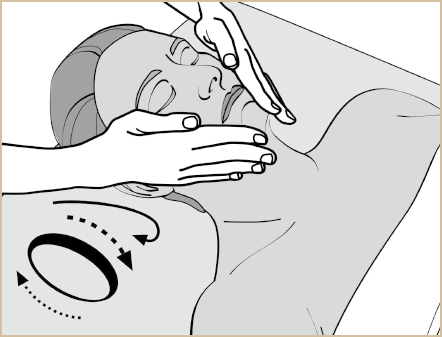
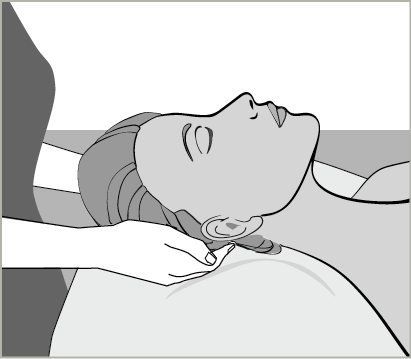
2. |
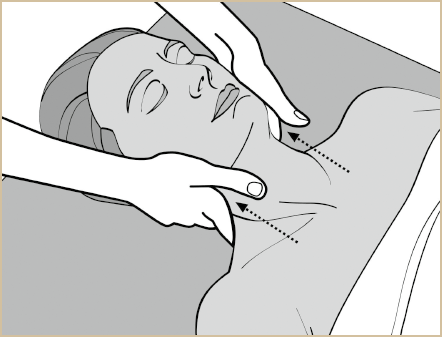
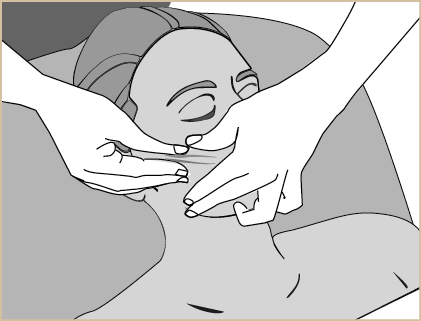
Run both hands lightly over the décolleté; the fingertips end directly above the armpits, the thumbs around the terminus. When the guest exhales, apply gentle pressure with the fingertips and thumbs. Perform 3 times. |
|
Why? - Activates the lymph flow - Supports the decongestion of the tissue - Promotes the removal of metabolic waste products |
|
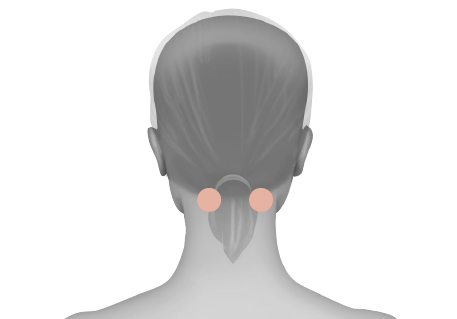
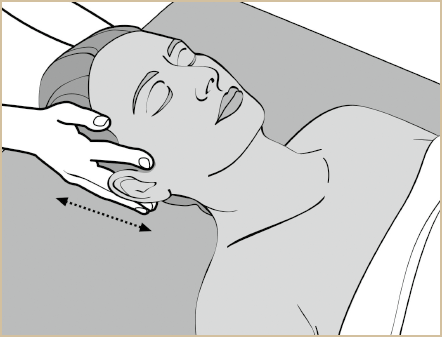
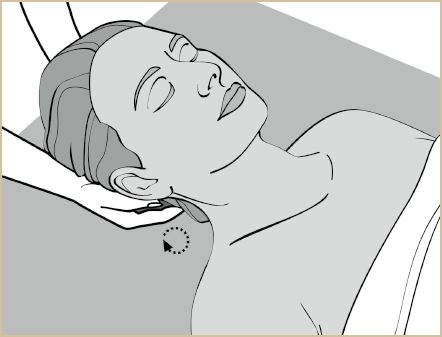
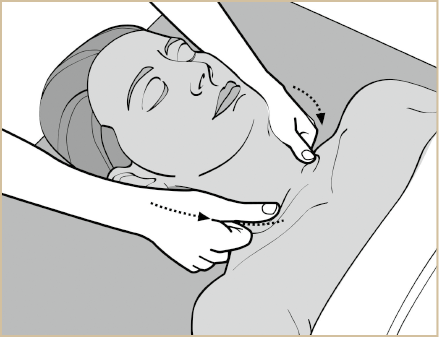
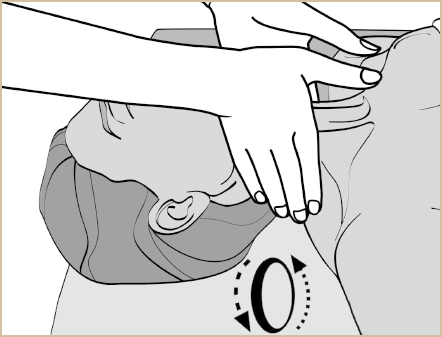
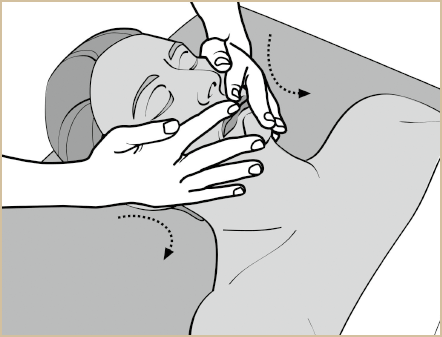
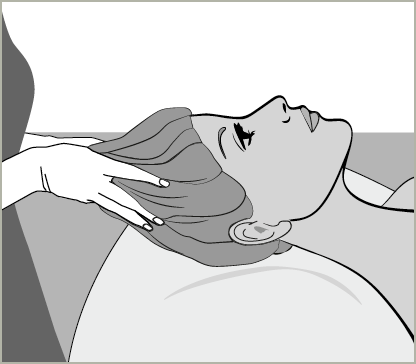
3. |
Lightly glide both hands around the shoulder up to the neck. When the guest exhales, apply gentle pressure around the occipital lymph nodes. Perform 3 times. |
|
Why? - Activates the lymph flow - Supports the decongestion of the tissue - Helps to clear the head |
GROUNDING RITUAL
|
BASIS FOR THE SUCCESS OF THE TREATMENT |
|
|
The prerequisite for healthy, clear, and radiant-looking skin is gentle yet effective skin cleansing. The renowned BABOR 2-phase deep cleansing involves the use of the classic HY-ÖL® Cleanser and HY-ÖL® Phyto Booster, effectively and gently eliminating both oil and water-soluble impurities in two consecutive phases. During the first phase, the HY-ÖL® Cleanser and HY-ÖL® Phyto Booster are applied, massaging to remove oil-soluble impurities from the skin. The second phase entails emulsifying the cleanser with cool water to eliminate water-soluble residues. The incorporation of cool water serves to safeguard the skin‘s natural protective barrier, offering a refreshing and revitalizing effect. This process optimally prepares the skin for the removal of the cleanser using warm compresses in line with Hydro-Therapy Stimulation. The efficacy and uniqueness of this application have persuaded us to integrate it as the foundational cleansing method in all BABOR treatments. |
|
Why?
- Dissolves oil-soluble and water-soluble dirt particularly effectively in 2 phases
- Refreshes and revitalizes the skin and is the ideal prelude to the subsequent Hydro-Therapy Stimulation
- Increases the skin‘s receptivity to subsequently applied active ingredients to achieve optimum treatment results
|
Execution |
|||
|
Step |
BABOR HY-ÖL® Cleanser & Phyto HY-ÖL® Booster |
Alternative BABOR Cleansing product |
|
|
|
1. |
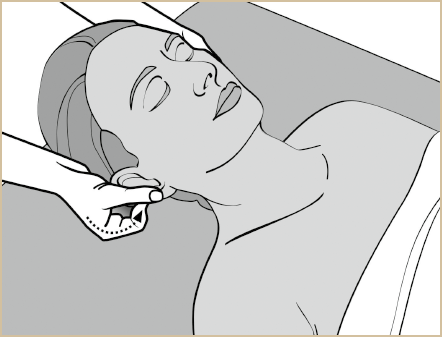
Remove eye make-up |
|
|
- Moisten 2 cotton pads with cool water and squeeze out well. - Pull the layers of both cotton pads slightly apart to form a pocket. - Place 1 pump of HY-ÖL Cleanser in each pocket and remove eye make-up. |
- Apply 2 - 3 pumps of Eye & Heavy Make-up Remover to 2 dry cotton pads and remove eye make-up. |
|
|
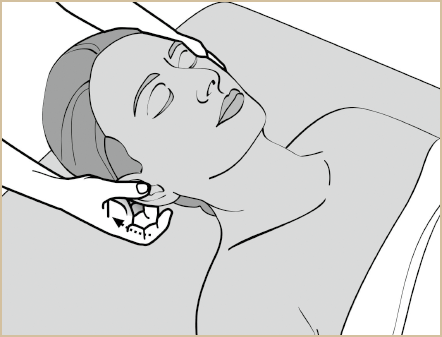
2. |
Remove lip make-up / foundation |
|
- Moisten 1 cotton pad with cool water and squeeze out the cotton pad well. - Apply 1 pump of HY-ÖL Cleanser to the cotton pad and remove lip make-up. |
- Apply 2 - 3 pumps of Eye & Heavy Make-up Remover to 1 dry cotton pad and remove lip make-up. - Apply 2 - 3 pumps of Eye & Heavy Make-up Remover to 2 dry cotton pads and remove foundation. |
|
PHASE I |
|||
|
|
3. |
Apply cleansing product |
|
|
- Take 4 pumps of HY-ÖL Cleanser in the palm of your hand and distribute it evenly to the guest’s face, neck, and décolleté. - Take 2 pumps of Phyto HY-ÖL Booster in the palm of your hand and draw the guest‘s attention to the fragrance and effect of the respective care additive. - Spread Phyto HY-ÖL Booster on the guest’s face, neck and décolleté. |
- Apply an appropriate amount of product to the face, neck, and décolleté and work it into the skin. |
|
PHASE II |
||
|
|
4. |
Emulsify Cleanser |
|
- Emulsify HY-ÖL Cleanser and Phyto HY-ÖL Booster by adding cool water 3 times to create a smooth emulsion that no longer feels oily |
- Emulsify the BABOR cleansing product by adding cool water 3 times |
|
|
5. |
Remove cleansing (see 4. Hydro-Therapy Stimulation) |
|
- Remove the cleanser with at least 2 warm compresses (38°C - 42°C). - Roll off a final, well-wrung, cool compress (14°C - 18°C) following the BABOR Hydro-Therapy Stimulation technique |
|
Tip: Cleansing heavy make-up First thoroughly dissolve make-up with HY-ÖL Cleanser and remove dry with cosmetic tissues. Then follow with the BABOR Deep Cleansing Ritual. |
DEEP CLEANSING RITUAL
|
FOR EXTRA OXYGEN & NUTRIENTS |
|
|
Every BABOR treatment is accompanied by our skin-activating and deep-stimulating Hydro-Therapy Stimulation, especially in the first third of the treatment. Inspired by the teachings of Father Sebastian Kneipp, we rely on a continuous alternation of pleasantly warm and cool compresses to remove the cleansing, peeling and Skin Activator Gel (Rich Vitalizing Mask). In the 1800s, Sebastian Kneipp recognized that the body could heal itself with the help of hydrotherapy and the alternating use of warm and cold water. In our treatments, we use the so-called thermophysical effect by applying refreshing cold stimuli after pleasantly warming the skin, which initially causes the blood vessels to constrict, but this is quickly followed by vasodilation and thus an increase in blood flow. |
|
Why?
- Increases the skin‘s blood circulation and metabolism, thus increasing the supply of oxygen and nutrients
- Supports improved removal of metabolic waste products
- Increases the skin‘s ability to absorb subsequently applied active ingredients to achieve optimum treatment results
- Refreshes intensively and increases the feeling of well-being
|
EXECUTION |
|||
|
Step |
Description |
||
|
When? |
Compress method for removing: - Cleansing - Peeling - Skin Activator Gel (Rich Vitalizing Mask) - Cream Mask (number of warm compresses as required) |
||
|
1. |
Remove product residues with at least 2 warm compresses (38°C - 42°C) |
||
|
Why? - To thoroughly remove all residue - To warm the skin evenly |
|||
|
|
2. |
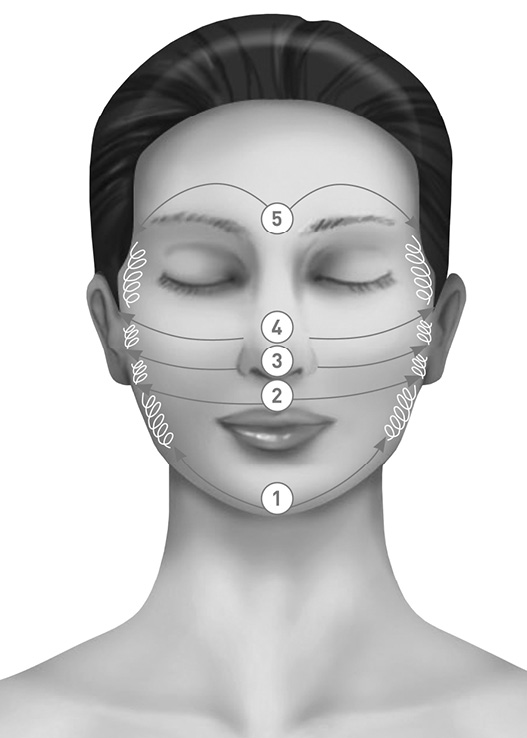
Use a well-wrung, cool compress (14°C - 18°C) in the special BABOR way as follows: - Place the compress on the face, press down lightly and gently rock the guest‘s head back and forth. - Gradually unroll the compress to the points described below, while applying light pressure with fingertips in gentle circular movements from the inside to the outside: |
|
|
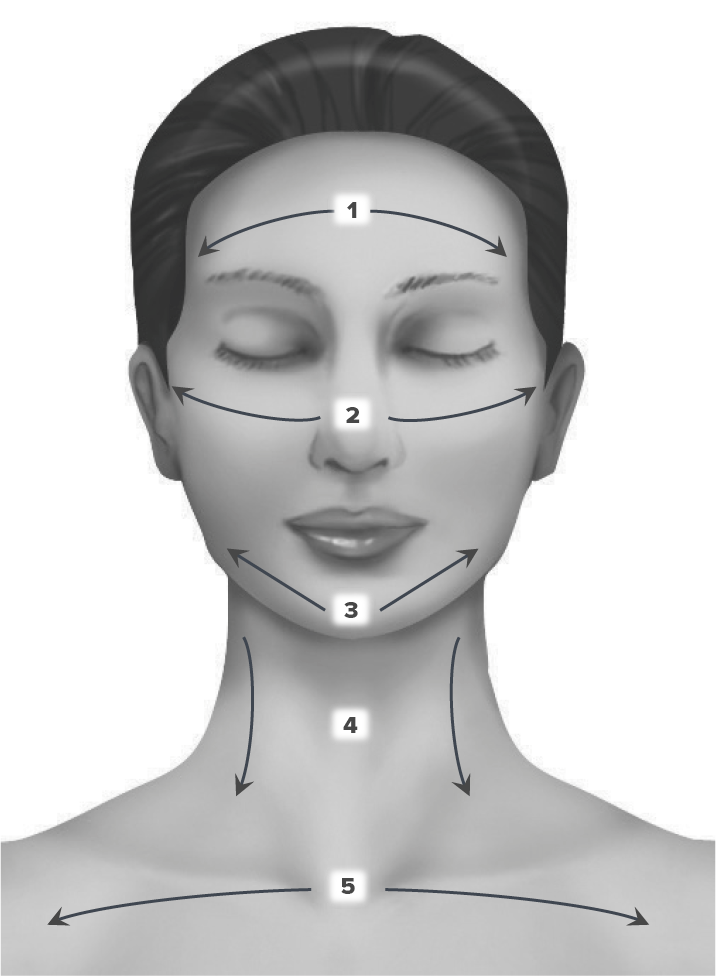
1. Pressure points at the hairline 2. Roll down to the eyebrows and apply pressure 3. Roll down to under the cheekbones and apply pressure 4. Roll down to the corners of the mouth and apply pressure 5. Starting at the chin, turn the compress over the neck region with skin contact and place on the décolleté. 6. Fold the compress in on both sides towards the centre. Let your guest inhale deeply. When the guest exhales apply pressure with flat hands. Release the pressure as they inhale. 7. Finally, wrap the compress again on both sides towards the centre and lift it off the skin. |
|
Why? Rolling and applying pressure with the cool compress stimulates numerous reflex zones on the face (e.g. the reflex zones for the bladder, liver, gall bladder, large intestine, lungs, and small intestine). This leads to an intense state of relaxation and a feeling of well-being. |
HYDRO-THERAPY-STIMULATION
|
THE REDNESS OF YOUR SKIN - AN INDICATOR OF YOUR VITALITY |
|
|
In every BABOR treatment, a unique „Skin Power Workout“ with the BABOR Skin Activator Gel (Rich Vitalizing Mask) is used as part of the intensive skin preparation. With its active ingredients, and in combination with the Hydro-Therapy Stimulation, this very special preparatory mask intensively triggers the skin‘s blood circulation. The level of skin redness achieved after removing the Skin Activator Gel (Rich Vitalizing Mask) serves as an indicator of its vitality. Optimal oxygen and nutrient supply to the skin is dependent on effective skin circulation. At the same time, the intensive increase in blood circulation stimulates the metabolism, positively contributing to skin regeneration and the elimination of metabolic waste products. These conditions create an ideal environment for the optimal absorption of active ingredients. |
|
Why?
- Indicates to the professional vital and less vital areas of the skin via the level of redness and is therefore an additional element of a professional skin analysis
- Increases the skin‘s blood circulation and metabolism, thus increasing the supply of oxygen and nutrients in the skin
- Supports skin regeneration and improved removal of metabolic waste products
- Enhances the skin‘s receptiveness to absorb subsequently applied active ingredients, ensuring optimal treatment results
|
EXECUTION |
|||
|
Step |
Description |
||
|
When? |
After cleansing |
||
|
|
1. |
Application Apply Skin Activator Gel (Rich Vitalizing Mask) with a wide fan brush using long, smooth strokes as follows: |
|
|
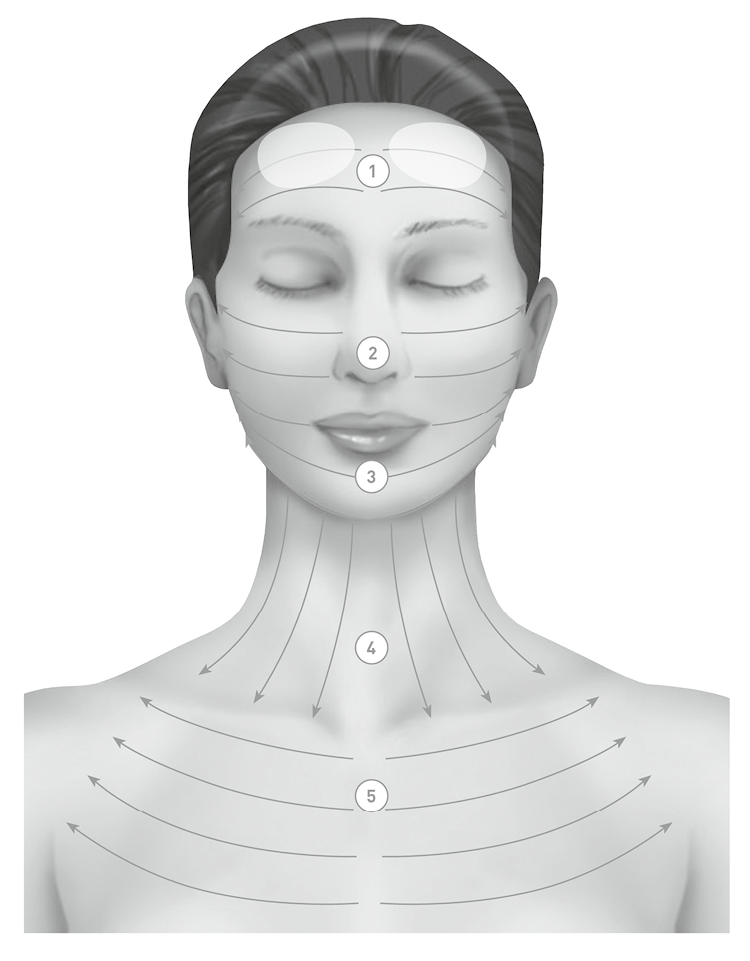
1. Décolleté 2. Neck, including the side areas 3. Peipherally around the face 4. Over the nose and upper lip 5. Then spread the mask evenly from the outside to the inside. Important: - Apply the mask evenly and without gaps - For vascularly fragile skin, only apply peripherally around the face, to relieve the vessels. |
|
|
2. |
Removal (see 4. Hydro-Therapy Stimulation) - Immediately after application, remove Skin Activator Gel (Rich Vitalizing Mask) with at least 2 warm compresses (38°C - 42°C). - Roll off a final, well-wrung out, cool compress (14°C - 18°C) using the BABOR Hydro-Therapy Stimulation. |
|
|
Notes: - Do not use Skin Activator Gel (Rich Vitalizing Mask) on irritated or severely irritated skin! - Avoid visible veins! - In case of thyroid disorders, avoid the neck altogether! - Avoid contact with eyes or mucous membranes! |
||
VITALITY ANALYSIS & BOOST
5. VITALITY ANALYSIS & BOOST
|
WHAT DOES THE LEVEL OF REDNESS OF YOUR SKIN REVEAL ABOUT THE VITALITY |
|
|
After removing the BABOR Skin Activator Gel (Rich Vitalizing Mask), the skin may show very different levels of redness. The „reddening“ of the skin should be announced to the guest beforehand and shown and explained with the help of a cosmetic mirror. As part of the professional skin analysis, the redness of the skin shows how well the epidermis is supplied with oxygen and nutrients by capillary vessels. In areas of vital skin, the dermal papillae remain well-developed, ensuring optimal interlocking between the epidermis and dermis. This condition facilitates improved blood circulation stimulation compared to other areas. Vital skin zones therefore blush faster and more intensely than less vital zones. These can even remain completely without reaction |
|
|
Level of redness |
||
|
- Even reddening |
- Slight but visible redness - Redness may occur with a time delay |
- Non-visible redness - Slight, but only localized redness |
|
|
|
|
|
The skin is vital and optimally nourished. |
The skin works more slowly. |
The skin is less vital and undersupplied. |
|
|
|
|
|
What does this mean for treatment / product selection? |
||
|
Perfect conditions for an optimal treatment result. |
Depending on the skin condition, use of: - Massages - Ultrasound - Microdermabrasion - AHA peeling - Micro needling - Activating, regeneration-promoting products |
Depending on the skin condition, use of: - Massages - Ultrasound - Microdermabrasion - AHA peeling - Micro needling - Activating, regeneration-promoting products |
What should be considered?
When you are assessing the skin’s vitality based on the level of reddenning, bear in mind that the skin’s circulation can be influenced by a variety of factors:
- Smoking
- Regular alcohol consumption
- Lack of sleep
- Lifestyle habits (exercise, fresh air,...)
- Medication
- Skin age
A detailed medical history before starting the treatment is therefore a basic requirement for being able to correctly interpret the level of reddening on the skin.
Skin thickness, level of keratinisation, skin colour (certain phototypes) and skin dryness can also influence the level of reddening on the skin surface.
VITALITY ANALYSIS & BOOST
|
PROFESSIONAL APPLICATION METHOD TO ENHANCE THE EFFECT |
|
|
With the Lymphatic Stimulation & Active Infusion, every BABOR treatment starts with an Ampoule Serum Concentrate, Serum or an active concentrate that is individually tailored to the skin care requirements. The sophisticated application method for working in the liquid concentrates combines decongesting movements inspired by manual lymphatic drainage according to Dr. Emil Vodder, along with stimulating and activating sequences that incorporate calming and relaxing elements. It ensures optimal absorption and utilization of active ingredients deep into the skin and forms the basis for a convincing treatment result. |
|
Why?
- Activates the lymphatic system and helps to decongest the tissue
- Supports the removal of metabolic waste products
- Promotes blood circulation in the skin
- Relieves tension in the facial muscles
- Supports the absorption and utilization of active ingredients
- Promotes relaxation and a feeling of well-being
|
Products |
All BABOR Ampoule Serum Concentrates, serums, and active concentrates |
|
When? |
After cleansing, Skin Activator Gel (Rich Vitalizing Mask) and/or peeling |
|
Duration |
Approx. 4 minutes |
|
Application |
Dispense the Ampoule Serum Concentrate or serum/active concentrate into the palm of your hand. Apply and spread evenly over the face, neck, and décolleté. |
|
1. DRAINING WAVE |
|
|
|
Why? - Activates the lymphatic system and helps to decongest the tissue - Supports the removal of metabolic waste products |
|
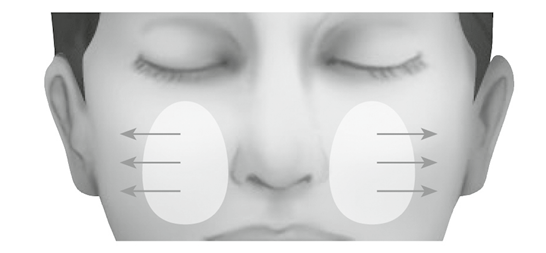
Place your hands flat on the skin and perform a waving or rocking movement with both hands moving in together. Ensure that the fingertips are pointing down towards the guest’s feet. Always work from the centre of the face outwards, applying light outward pressure. Perform 5 waving or rocking movements in each section. Repeat the movements 3 times. |
||
|
|
1. Forehead - from the centre of the forehead to the temples |
|
|
2. Cheeks - from the sides of the nose to the ears |
||
|
3. Jawline - from the chin along the jawline to the ears |
||
|
4. Neck - along the sides of the neck to the décolleté |
||
|
5. Decolleté - from the centre of the décolleté to the armpits |
||
LYMPHATIC ACTIVATION & ACTIVE INFUSION
6. LYMPHATIC ACTIVATION & ACTIVE INFUSION
|
2. |
ACTIVE TRAINING |
|
|
|
Why? - Promotes blood circulation in the skin - Improves muscle tone - Supports the absorption and utilization of active ingredients |
|
|
1. Raindrops Simulate raindrops on the cheeks with the fingertips |
|
|
2. Tapotement Lightly tap with the fingertips over the 3 sections; repeat each section 3 times: - from the centre of the chin to the ears - from the corners of the mouth to the ears - from the sides of the nose to the ears |
|
3. |
DYNAMIC PRESSURE |
|
|
|
Why? - relaxes the facial muscles, leaves a feeling of lightness - literally presses the active ingredients into the skin and supports their absorption and utilization |
|
|
Place the palms of your hands flat on the following areas of the face, apply gentle pressure 3 times, and release again |
|||
|
1. |
Forehead |
Place one hand on top of the other across the forehead |
|
|
2. |
Cheeks |
Palms rest on the temples |
|
|
3. |
Chin |
Palms rest below the ears on the jawline; fingers point towards each other |
|
|
4. |
Sides of neck |
The balls of the hands are at the side of the neck; the fingers point towards the collarbone |
|
|
5. |
Decolleté |
The balls of the hands are below the shoulder joint; the tips of the fingers point towards each other. |
|
|
4. |
FUNCTIONAL GROUNDING |
|
|
|
Why? - The guest feels in harmony with body and mind - Brings the guest back to the present moment, announces the end of this treatment step |
|
|
1. |
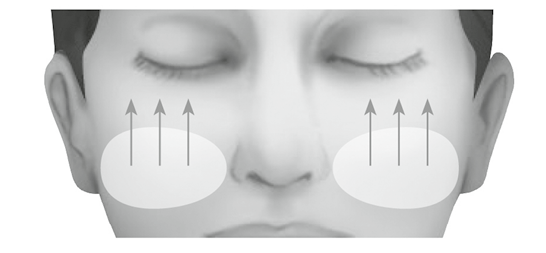
Cup your hands and place carefully over the eyes. Hold this position for 3 seconds. |
||
|
2. |
Place your index and middle fingers on the temples and circle gently towards yourself 3 times, the last circle ends with gentle, constant pressure |
||
|
Note: If 3 moisturizing Ampoule Serum Concentrates are applied consecutively during the HYDRA BOOST TREATMENT, the last Ampoule is worked in with the Lymphatic Activation & Active Infusion. |
LYMPHATIC ACTIVATION & ACTIVE INFUSION
6. LYMPHATIC ACTIVATION & ACTIVE INFUSION
Particularly deep professional treatments require a special method for applying the serum.
That‘s why we use Lymphatic Stimulation & Active Infusion with super-soft sponges as part of our DOCTOR BABOR PRO AHA peelings with fruit acid content >/= 20 %. These seamlessly conform to the skin‘s surface, providing a gentle and effective massage that facilitates deep penetration of the serum without causing additional stress to the skin.
|
LYMPHATIC ACTIVATION & ACTIVE INFUSION |
|
|
Product |
DOCTOR BABOR PRO BG – Beta Glucan |
|
Tool |
BABOR Sponges |
|
When? |
After a DOCTOR BABOR PRO AHA peeling with fruit acid content > / = 20% |
|
Duration |
Approx. 4 minutes |
|
Apply |
Dispense 1 ml of serum (= 1 pipette length) onto one BABOR Sponge and apply to the right half of the face. Repeat on the left half of the face and bring down to the neck, and décolleté. Then spread the serum evenly with both sponges to distribute the product. |
|
1. DRAINING WAVE |
|
|
|
Why? - Activates the lymphatic system and helps to decongest the tissue - Supports the removal of metabolic waste products |
|
Apply the sponges flat (narrow sides facing each other) and perform a parallel wave or rocking motion. Always work from the centre of the face to the outside in a circular motion, applying light outward pressure. |
||
|
|
1. Forehead (2 sections) - Centre of the forehead to the temples |
|
|
2. Cheeks (3 sections) - Sides of the nose to the ears - Nostrils to the ears - Corners of the mouth to the ears |
||
|
3. Chin & Jawline (2 sections) - Centre of the chin along the jawline to the ears - Below the chin and jawline up to the ears |
||
|
4. Neck (3 sections without pressure. Move down towards décolleté) - Start in the middle below ching (next to the larynx) and work towards the sides of the neck |
||
|
5. Décolleté (4 sections) - Start close to the collarbone and work down |
||
LYMPHATIC ACTIVATION & ACTIVE INFUSION
6. LYMPHATIC ACTIVATION & ACTIVE INFUSION
|
2. ACTIVE RELAXING |
|
|
|
Why? - Loosens and relaxes the cheek and jaw muscles - The state of relaxation encompasses the entire face, resulting in a relaxed and liberated radiance. |
|
|
Perform 3 times. First movement: - Position the sponges with the long sides under the cheekbones - Pull upwards and hold - Slowly release tension and roll the sponges outwards |
|
|
|
Perform 3 times. Second movement: - Position the sponges with the long sides next to the sides of the nose - Pull sideways and hold - Slowly release tension and roll the sponges downwards |
|
3. DYNAMIC PRESSURE |
|
|
|
Why? - Literally presses the active ingredients into the skin and supports their absorption and utilization - Supports the removal of metabolic waste products |
|
Lay the sponges flat (the narrow sides facing each other), apply pressure to the sponges with the fingertips and then roll the sponges from the centre of the face outwards. Start at the centre of the forehead parallel to the hairline and continue following the below: |
||
|
|
1. Forehead (3 lines) - Centre of the forehead to the temples |
|
|
2. Eye Area (2 lines) - Along the eyebrow to the temples - Inner corner of the eye to the temples |
||
|
3. Cheeks (4 - 5 lines) - Next to the nose to the ears |
||
|
4. Chin (2 lines) - Middle of the chin to the ears |
||
|
5. Neck (3 lines without pressure) - Start in the middle below the chin and work to the base of the neck - Work towards sides of the neck |
||
|
6. Décolleté (5 - 6 lines) - Start in the centre of the décolleté close to the collarbone - Work down to bottom of the décolleté |
||
|
4. FUNCTIONAL GROUNDING |
|
|
|
Why? - The guest feels in harmony with body and mind - Brings the guest back to the present moment, announces the end of this treatment step |
|
1. - Carefully place the sponges horizontally over the eyes |
|
|
2. Slowly tilt the sponges onto their edge below the eyes and roll from the inside to the outside with pressure. Press onto the temples with the sponge edges 3 times. |
LYMPHATIC ACTIVATION & ACTIVE INFUSION
The highly effective BABOR Face Sculpting Massage was developed and extensively tested by experienced experts on a massage and physiotherapy basis; it activates, stimulates, and trains the skin from the surface to the depths and from the depths back to the surface with a unique combination of different grip techniques.
Integrating profound kneading and rolling methods, precise pinching techniques as advocated by Dr. Jacquet, and pressure point stimulation derived from Far Eastern practices, this approach is complemented by gentle, flowing elements inspired by Dr. Emil Vodder‘s manual lymphatic drainage and classic effleurage strokes. An extraordinary massage composition with an immediate face sculpting effect.
Hardening in the facial muscles and adhesions in the connective tissue are intensively loosened, allowing accumulated fluid in the tissue to drain away and immediately reduces skin and muscle tension. Facial features are visibly relaxed, expression lines appear immediately reduced, the natural facial shape and contours appear clearer and more defined, and the complexion looks more youthful and smoother.
|
FACE SCULPTING Massages |
|
|
When? |
After applying Ampoule/Serum/Active Concentrates & Eye Care, if necessary |
|
Duration |
Approx. 20 minutes |
|
Repetitions |
Each massage movement is performed 5 times, unless otherwise stated |
|
I. Introduction without product |
|
|
|
Why? - Relieves tension in the entire head, neck, throat, and shoulder area; relaxation extends to the face and immediately gives a relaxed radiance - Stimulates the lymphatic system |
Massages
|
1 |
Effleurage with both hands over the décolleté, from the sternum to the deltoid muscles |
2 |
Sweep up to the nape of the neck (1 x) |
3 |
Stroke the neck alternately up to the nape of the neck; the guest lets the head relax so that it sways gently to the right and left |
|
|
|
|
|
||||
|
4 |
Scalp movements with hands laid flat |
|||||
|
a. |
Place hands flat on sides of head with index finger in front of ear. Move both hands up and down together. |
b. |
Place both hands flat on the top of the skull, glide hands up and down |
c. |
Place both hands flat at the back of the head, glide hands up and down |
|
|
|
|
|
||||
|
5 |
Use your fingertips to „hook under the edge of the skull“ at the base of the neck and massage the short neck muscles with circular movements. |
|
||||
7. Massages
|
II. DEEP MUSCULAR RELAXATION |
|
|
Why? - Relaxes, loosens, and stretches the muscles and ensures well-being and relaxation - Releases hardening, adhesions, and tension in the facial muscles, loosens facial expressions, and immediately smooths wrinkles - Supports the subsequent drainage of unwanted fluid accumulation in the tissue - Trains and stimulates muscle and connective tissue and thus supports the natural shaping and contouring of the face - Promotes blood circulation in the skin and increases the supply of oxygen for optimal utilization of active ingredients |
|
|
Relaxation of décolleté, neck and nape |
|
|
|
Technique: Petrissage Exerts deep pressure on tissue and underlying muscles to relax them. - Kneading: moves the muscle with the fingertips against the bone and stretches it transversely - Rolling: rolls the muscles between the fingers |
Massages
|
6 |
Apply and spread the appropriate BABOR serum/cream over the face, neck, and décolleté. |
|||||
|
7 |
With firm pressure, use your fingertips to stretch the pectoral muscle from the centre outwards |
8 |
Knead the pectoral muscle with both hands on each side |
9 |
Knead the shoulder muscles |
|
|
|
|
|
||||
|
10 |
Using both your thumbs, knead the trapezius muscle |
11 |
Stroke fingers intensively up to the occipital hole (1x) |
12 |
Light pincer movement on the sternomastoid muscle in a downward direction (towards the guest’s feet) Caution: The neck/throat area is very sensitive to pressure! |
|
|
|
|
|
||||
|
Loosening of connective tissue adhesions & relaxation of facial muscles |
|
|
Technique: Light pinching according to Dr. Jacquet Loosening & training of the connective tissue - Skin is briefly lifted with thumb and index / middle finger and released again. |
|
13 |
Perform light pinching movements with fingertips as follows: |
a. Under the chin b. Chin c. Orbicularis oris muscle (corners of the mouth) d. Cheeks - from the centre outwards e. Temples f. Under the eyes g. Between the eyebrows (frown line) h. Forehead |
7. Massages
|
|
Technique: Petrissage |
Massages
|
14 |
With both hands, knead the muscles on the chin including the jawline |
15 |
Move to kneading the orbicularis oris muscle |
16 |
Using both hands together, roll the cheeks in 3 strips |
|
|
|
|
|
||||
|
17 |
Outward friction movements with the fingertips under the eyes |
18 |
Shift the tissue at the temples using ‘figure 8’ movement |
19 |
Moving the tissue on the forehead downwards and then stretching it outwards |
|
|
|
|
|
||||
|
20 |
Repeat moves 14 - 19 |
|||||
|
21 |
With both hands, start from the centre of the chin and use your thumbs, index, and middle fingers and perform an alternating rolling, walking movement. Work up to the ears then back to the chin and perform on the other side. |
22 |
Using your index and middle fingers, start from the centre of the chin and perform frictions (towards yourself). Always work from the centre of the face outwards to the temples. Finish with final circles at the temples. |
|
||
|
|
||||||
7. Massages
|
III. PRESSURE POINT MASSAGE |
|
|
Wha? - Stimulates energy points and releases blockages in the energy flow of important meridians of the gall blader, large intestine and stom - Provides holistic relaxation for body, mind and soul and ensures an intense feeling of well-being - Immediately makes the eye area appear more relaxed, alert, and radiant |
|
|
|
Technique: Acupressure (part of traditional Chinese medicine) Stimulation of energy points by pressing and releasing points with the fingertips |
Massages
|
23 |
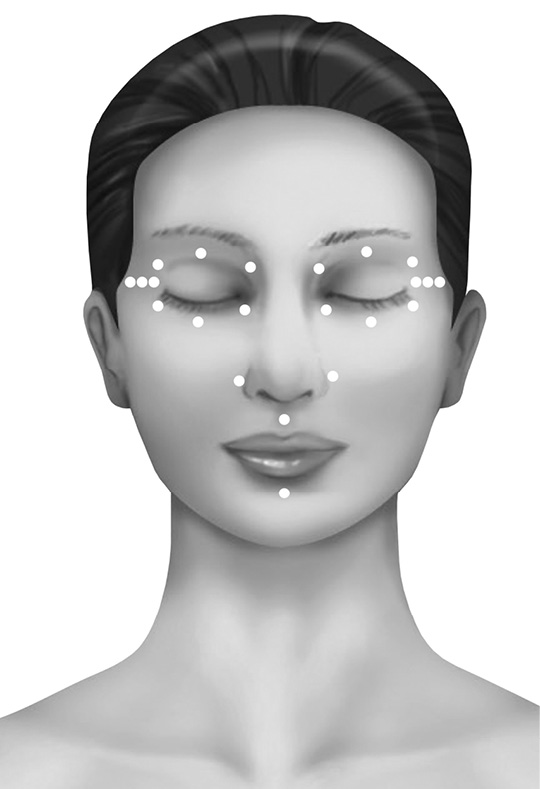
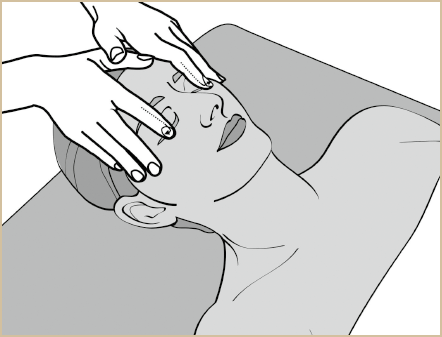
Perform each pressure point 3 times; apply pressure each time and release slowly. |
|||||
|
a. Introduction – using both thumbs, apply pressure to the crown of the head (highest point of the head) |
b. Using both middle fingers, apply pressure to the upper edge of the eye socket on the inner corner, centre and outer corner c. Using both thumbs, apply pressure to the lower edge of the eye corner on the inner corner, centre and outer corner d. Using both middle fingers, start at the corner of each eye and perform 3 pressure points towards the temples e. Using both middle fingers apply pressure to the sides of the nose f. Using 1 middle finger, apply pressure to the top of the lip g. Using 1 middle finger, apply pressure to the chin dimple |
|
||||
|
|
||||||
|
24 |
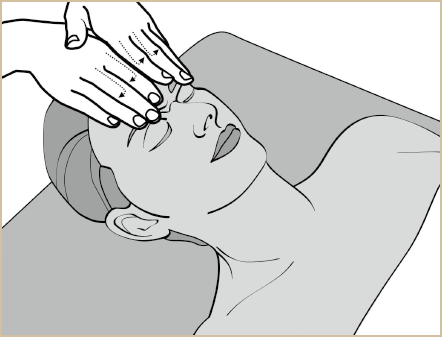
Hold both hands over the eyes to form a “roof” for 10 seconds |
25 |
sing your thumbs, apply pressure and effleurage over the eyebrow 5 times |
26 |
Using your thumbs and fingers, effleurage along the edges of the ears |
|
|
|
|
|
||||
|
27 |
Using your thumbs, massage the auricle with pressure |
28 |
Apply appropriate BABOR cream to the face, neck, and décolleté |
|||
|
|
||||||
7. Massages
|
VI. DECONGESTION OF THE TISSUE |
|
|
Why? - Activates the lymphatic system, helps to decongest the tissue, and reduce unwanted fluid accumulations in the tissue - Contributes to a reduction in muscle tension, relaxes the tissue, and promotes the natural shaping and contouring of the face - Supports the removal of metabolic waste products |
|
|
|
Technique: principle of „standing circles“ based on manual lymphatic drainage according to Dr. Vodder. The skin is stretched in a circular motion with gentle pressure during the light pressure phase, followed by release in the zero phase. The circular movement, or „working direction“, always aligns in the direction of the nearest lymph nodes. On the face, this involves an outward motion towards the ears and subsequently into the neck or terminus area, located above the collarbone hollow. |
Massages
|
29 |
Side of the neck |
30 |
Terminus |
31 |
Floor of the mouth |
|
|
|
|
|
||||
|
32 |
Lower jaw |
33 |
Upper jaw |
34 |
Tear sac area with fingertips |
|
|
|
|
|
||||
|
35 |
Use your fingertips to massage the eyeballs (carefully!) |
36 |
Forehead |
37 |
„Long journey“: Upper jaw (33), cross grip on the ears, neck (29), terminus (30) |
|
|
|
|
|
||||
|
38 |
To finish, smooth out the décolleté |
|||||
7. Massages
In treatments lasting over 50 minutes, a massage is essential.
The 10 minute condensed massage incorporates fundamental elements, including deep loosening of muscular tension and adhesions, alongside lymph-activating techniques designed to alleviate tissue congestion.
This condensed massage ensures an immediate smoothing effect.
|
EXPRESS FACE SCULPTING MASSAGE |
|
|
When? |
After applying Ampoule/Serum/Active Concentrate & Eye Care, if necessary |
|
Duration |
Approx. 10 minutes |
|
Repetitions |
Each massage movement is performed 5 times, unless otherwise stated. |
|
I. INTRODUCTION WITHOUT PRODUCT (2 minutes) |
|
|
II. MUSCULAR DEPTH RELAXATION (4 minutes) - Without plucking according to Dr. Jacquet - Petrissage 14th - 19th in one pass only; grips 21 & 22 omitted |
|
|
VI. TISSUE REMOVAL (4 minutes) |
|
Massages
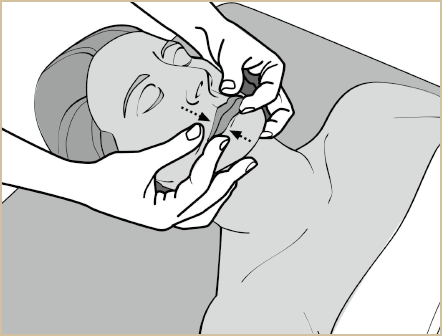
BACK IN THE HERE & NOW
The concluding, invigorating effleurage on the face, coupled with activating stretches in the shoulder and neck region, along with pressure point activation at the third eye, marks the conclusion of every BABOR treatment, gently guiding the guest from a state of relaxation back to the present moment.
Why?
- Switches body & mind from „rest mode“ to „activity“
- „Awakens“ the relaxed muscles and helps to rebuild body tension after the rest phase
|
|
EXECUTION |
||
|
Step |
Description |
||
|
Wann? |
After applying the finishing care to end the treatment |
||
|
How? |
In supine position |
||
|
1. |
Using your index fingers and thumbs, massage each earlobe |
Why? It wakes you up and awakens your energy |
||
|
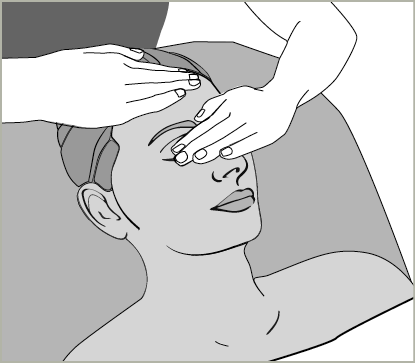
2. |
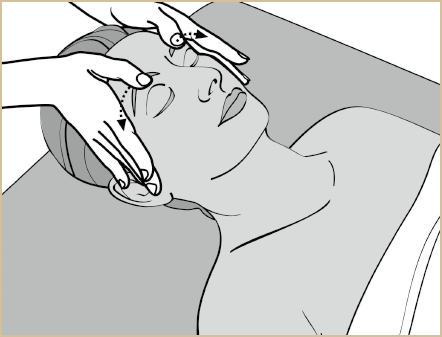
Press the point between the eyebrows (3rd eye) 3 times. |
Why? Increases perception and mental abilities |
||
|
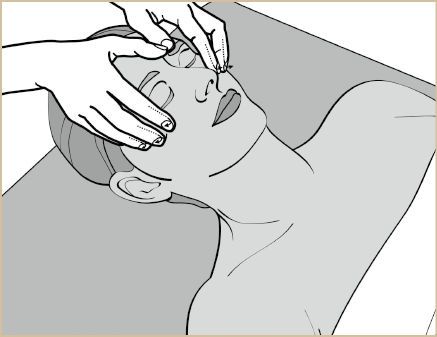
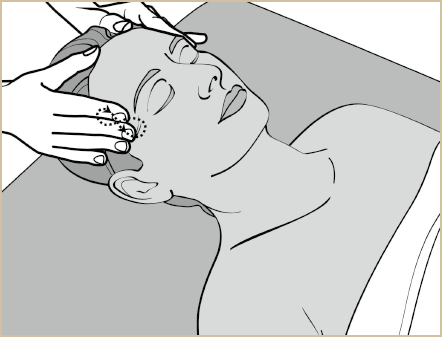
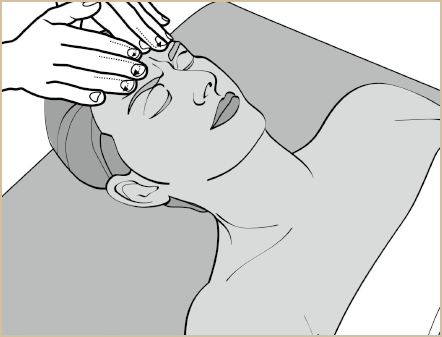
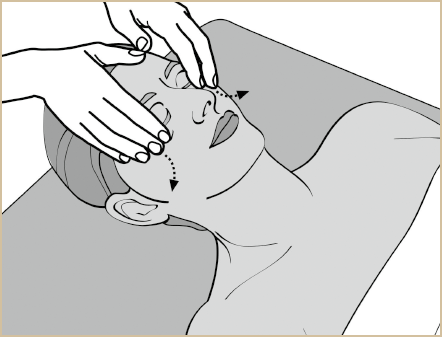
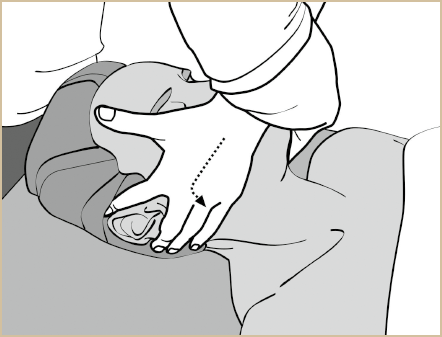
3. |
Using alternating hands, start at the tip of the nose and apply pressure along the bridge of the nose up to the forehead finishing at the hairline. Repeat 3 times. Then place both hands on the forehead and apply pressure to the cheeks, chin, and neck down to the décolleté. |
|
Why? Activating, supports breathing |
|
|
4. |
Using both hands, gently stroke the décolleté towards the shoulders. Let the guest inhale deeply and apply gentle pressure to both shoulders as they exhale. Release the pressure again as they inhale. Perform 3 times. |
|
Why? Gentle stretching of the chest and related upper shoulder muscles |
|
|
5. |
Stroke over the shoulders and neck towards the back of the head. Hook your fingertips on the edge of the skull and gently pull on the back of the neck. Perform 3 times. |
|
Why? Gentle stretching of the neck muscles |
|
|
6. |
From the nape of the neck, spread out your fingers and apply pressure over the entire back of the head moving towards the top of the head. As you do this, gently comb through the hair with your fingers, lifting it upwards and gradually releasing tension. |
|
Why? Activating |
REAWAKENING RITUAL