Start
BABOR MICRODERMABRASION
|
THE TOPICS AT A GLANCE |
||||
|
1. |
4 |
|||
|
What is Microdermabrasion? |
4 |
|||
|
How does the BABOR MICRODERMABRASION work? |
4 |
|||
|
Which crystals are used? |
4 |
|||
|
What does Microdermabrasion do? |
4 |
|||
|
Application spectrum of the BABOR MICRODERMABRASION |
4 |
|||
|
How does the skin react to BABOR MICRODERMABRASION? |
5 |
|||
|
Home care after BABOR MICRODERMABRASION? |
5 |
|||
|
2. |
6 |
|||
|
Contraindications |
6 |
|||
|
Aftercare post BABOR MICRODERMABRASION treatment? |
6 |
|||
|
3. |
7 |
|||
|
Regulation of the application intensity |
7 |
|||
|
Application technique & duration |
8 |
|||
|
Ceramic Microdermabrasion - for the ultra glow |
11 |
|||
|
Treatment frequency |
11 |
|||
|
4. |
12 |
|||
TABLE OF CONTENTS
What is Microdermabrasion?
Cosmetic Microdermabrasion is a controlled and painless mechanical removal of the upper horny layer of the epidermis.
How does the BABOR MICRODERMABRASION work?
Using a vacuum system or pump, delicate crystals are guided from the newly filled crystal container onto the skin through the handpiece. Upon contact with the skin, these crystals eliminate horny skin cells. Subsequently, a vacuum extracts the crystals along with the dissolved keratinized cells, directing them into the previously utilized crystal container.
Which crystals are used?
With BABOR MICRODERMABRASION, we’ve got a unique approach using two different types of crystals. This gives you the option for a two-step, exclusive treatment for your guest.
 1. Ionic crystals for carrying out Ionic Microdermabrasion
Ionic crystals - compound of the chemical element aluminium with oxygen
- Exceptionally durable (Mohs hardness 9)
- Melting point of 2045°C
- Chemically inert
→ Use with every Microdermabrasion treatment
2. Ceramic Crystals for carrying out Ceramic Microdermabrasion
Ceramic crystals
- Even finer than ionic crystals
- Rounded and less abrasive
→ Use as a “skin polish” immediately after Microdermabrasion with Ionic Crystals for customers who want an ultra-glow and velvety finish.
 What does Microdermabrasion do?
The deliberate removal of the upper layers of skin prompts the heightened development of youthful, functional skin cells in the basal cell layer. These cells migrate to the surface, progressively replacing the eliminated material..
Microdermabrasion initiates a signalling cascade in the skin, leading to intensive regeneration activity and cell renewal, resulting in a finer, smoother, and more even skin structure.
Additionally, the removal of outer horny cells stimulates fibroblasts in the connective tissue to produce new collagen and elastin fibres. Consequently, Microdermabrasion has the potential to enhance the density and structure of both the dermis and epidermis.
In addition, the removal of the uppermost horny layers increases the skin’s absorption capacity.
Therefore, Microdermabrasion serves as an optimal method to prepare the skin, enhancing its readiness for the intensive application of active ingredients during a professional treatment.
Application spectrum of the BABOR MICRODERMABRASION
By supporting the natural regeneration process, Microdermabrasion can achieve positive, lasting results for a wide range of indications.
Microdermabrasion is therefore suitable for the following skin types/conditions:
• Tired skin in need of regeneration
• Skin with inadequate blood circulation
• Smoker’s skin
• Atrophic skin
• Disrupted barrier
• Skin with enlarged pores and scarring (resulting from healed acne)
• Wrinkles, loss of tone, and elasticity
• Skin with blemishes, comedonal acne, and late-onset acne (acne tarda)
• Superficial hyperpigmentation
• Hyperkeratinization
• Stretch marks
BABOR MICRODERMABRASION
1 MICRODERMABRASION
How does the skin react to BABOR MICRODERMABRASION?
A temporary feeling of dryness and redness may occur after the Microdermabrasion treatment. In very rare cases, the negative pressure system can cause slight bleeding into the tissue, which disappears after a few days.
Depending on the condition of the skin, the redness will subside within a few hours.
If the redness has not subsided after 24 hours, the customer should contact her BABOR expert. A Dermatologist may need to be consulted.
In the case of underlayment, there may initially be a “blooming”, i.e. an initial aggravation.
Home care after BABOR MICRODERMABRASION?
After the Microdermabrasion treatment, BABOR products tailored to the individual skin care goal should be recommended for use at home.
An ideal regimen involves a combination of serum, cream, and a sun protection product for daytime use, complemented by a light fruit acid peeling. The peeling should be applied at home on days 3-4 following Microdermabrasion to synergistically support the ongoing regeneration activity initiated by the treatment.
BABOR MICRODERMABRASION
|
Contraindications |
|
|
Microdermabrasion is contraindicated in specific cases. The following list outlines the most common contraindications: • Herpes (Consider Herpes Prophylaxis for individuals prone to herpes) • Couperose / Rosacea (Consultation with a Dermatologist is necessary for possible treatment) • Cancers and Tumors • Psoriasis with Köbner phenomenon • Acute Neurodermatitis (Treatment may be possible during “symptom-free” periods, depending on severity) • Warts, moles, and birthmarks • Keloids • When taking Cortisone or Glucocorticoids • If using Anti-acne medication like Roaccutane, wait at least 12 months, depending on dosage and duration • For pathological, inflammatory skin conditions, or skin lesions caused by bacteria, mycoses, or viruses • During active bacterial or viral infections, and when experiencing fever • In cases of autoimmune diseases (e.g., vitiligo) • For unstable diabetics • After chemical peelings or other peeling treatments - After Fruit Acid Peeling / peeling treatment: Wait 2 - 4 weeks - After TCA Peeling: Wait at least 6 weeks - After Phenol Peeling: Wait at least 8 weeks • Following cosmetic surgery, consult with the doctor. • After receiving injections, consult with the doctor. • Post laser treatments, consult with the doctor. • For Fitzpatrick skin types IV - VI (Indian/African), deep Microdermabrasion is not recommended to prevent pigment shifts. • If taking Marcumar or other blood-thinning medication • With long-term use of aspirin We do not recommend undergoing Microdermabrasion treatments during pregnancy and breastfeeding. The skin tends to be more sensitive and reactive during this period, coupled with heightened sensitivity to light. Undesirable side effects may occur due to hormonal changes, making it a precautionary measure to avoid such treatments during these stages. If in doubt, always consult your doctor. Aftercare post BABOR MICRODERMABRASION treatment? Following Microdermabrasion, it takes 2 - 3 days for the skin to completely regenerate its natural barrier, restoring its own natural protection. Throughout this period, individuals undergoing the procedure should avoid: • Extended exposure to sunlight or tanning beds • Intense sweating (such as in saunas) • Other abrasive or chemical peeling treatments • Hair removal in the treated areas • Application of self-tanning products • Swimming pools with chlorinated water or sea water After a single Microdermabrasion treatment, a suitable DOCTOR BABOR SOLAR DEFENSE product with adequate sun protection should be applied during the day for the following 7 days. The same applies during a treatment course with Microdermabrasion. After completing the treatment, sun protection during the day is recommended for a further 14 - 21 days. |
|
WHAT SHOULD BE CONSIDERED?
Regulation of the application intensity
The BABOR MICRODERMABRASION offers adjustable treatment intensity by simply regulating the vacuum. Operating efficiently from the gentlest setting, it is suitable for vascularly labile and/or highly sensitive skin. The overall intensity of the Microdermabrasion is tailored to individual skin sensitivity to mechanical stimuli and the client’s comfort level. A slight diffuse redness after each stroke is considered ideal in general.
The intensity of Microdermabrasion is controlled by the following 2 parameters:
1. Vacuum
- Regulates the speed at which the crystals are directed onto the skin surface.
- Regulates the suction strength with which crystals and dissolved horny flakes are sucked away from the skin.
|
Controller Position |
Skin condition and when? |
Notes |
|
1 |
Very sensitive skin areas |
Especially for the eye area, neck, décolleté, areas with visible vessels |
|
2 |
Sensitive skin, sensitive skin areas |
|
|
3 |
Normal, less sensitive skin |
|
|
4 |
Robust skin, severe calluses, sensitive areas of the body Ceramic Microdermabrasion Execution after Microdermabrasion with ionic crystals |
|
|
4–6 |
Normal body areas |
|
|
7 |
Robust body areas |
|
|
4–7 |
Scar treatment |
|
|
4–5 |
Suction Remaining crystals after Microdermabrasion. |
First remove the fresh crystal container and remove any residual crystals from the hose! Perform small circles when vacuuming. |
2. Speed of handpiece guidance
- Working at a slower pace increases the concentration of crystals hitting a specific area of the skin, leading to a more intense level of ablation.
WORKING METHOD
3 WORKING METHOD
Application technique and duration
 1. Head positioning
Ensure the client’s head is correctly positioned for the optimal treatment of each facial area, allowing for effective and efficient work.
2. Handpiece guide
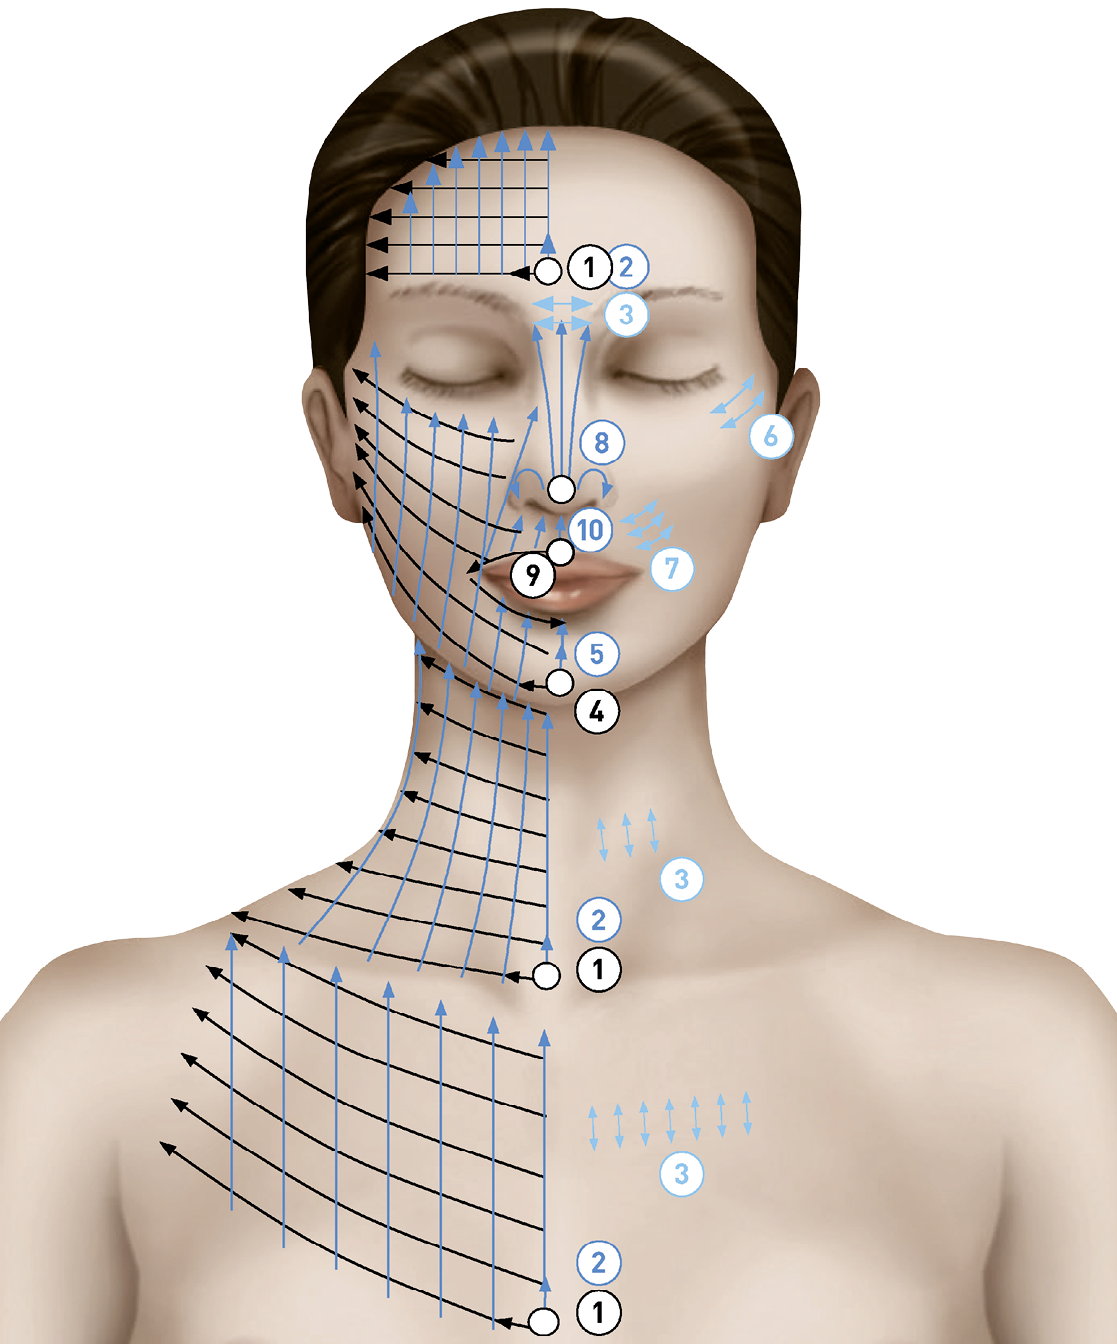
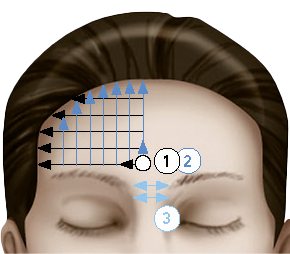
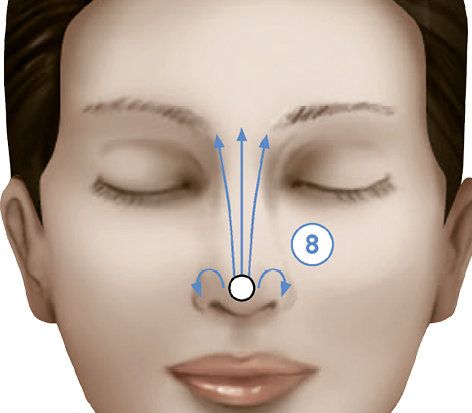
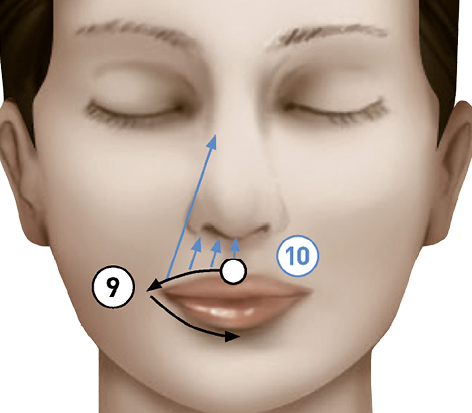
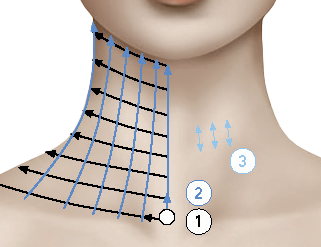
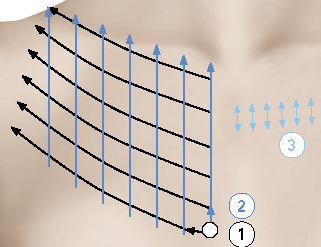
Perform slow, concentrated strokes, first from the centre of the face outwards, then perpendicular to the original direction upwards, resulting in a checkerboard pattern.
To ensure optimal treatment, stretch the skin using the index and middle fingers of the free hand starting from the designated point marked with a white dot in the provided sketches. Move the handpiece away from the attached fingers, avoiding movement towards them.
After each path, lift the handpiece from the skin and reposition it slightly above the previous attachment point. Ensure that the subsequent path is executed with a slight overlap to achieve a consistent treatment outcome.
Follow a systematic approach by treating each part of the face consecutively on both the right and left sides for uniform results. Avoid skipping any skin areas unless necessary due to localized inflammation or contraindications.
If feasible, use the right hand for the right side and the left hand for the left side. For more calloused areas or targeting lines/wrinkles, employ the erasing technique with slow, concentrated strokes (approximately 2 - 3 cm). Depending on treatment goals, skin thickness, and condition, each stroke can be repeated 2 - 4 times, considering individual skin sensitivity.
3. Duration of application
The optimal duration of microdermabrasion varies from person to person. In general, Microdermabrasion for the face takes 10 minutes and an additional 10 minutes for the neck and décolleté.
A further 10 minutes must be scheduled for the Ceramic Microdermabrasion on the face
|
|
|
Face |
|
|
Neck |
|
|
Neckline |
WORKING METHOD
3 WORKING METHOD
|
Microdermabrasion - Face |
|
|
|
Forehead – right side, then left side |
|
1. |
Horizontal |
- From the centre of the forehead outwards to the hairline |
|
|
|
|||
|
2. |
Vertical |
- From above the eyebrows to the hairline |
|
|
|
|||
|
3. |
Erase |
- If required: frown lines |
|
|
|
|
|
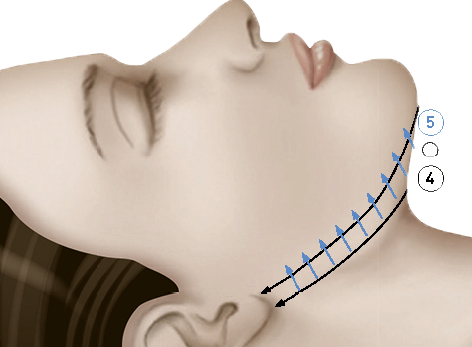
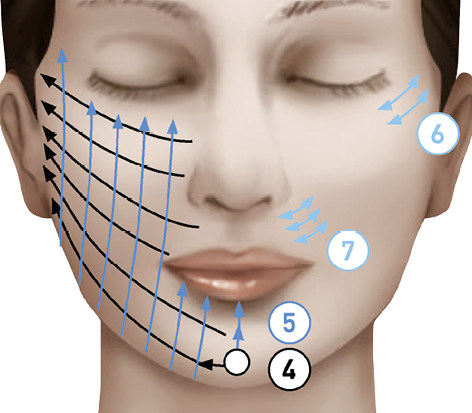
II Underside of chin, chin & cheek - right side, then left side |
|
4. |
Horizontal |
- Underside of the chin: position clients head sideways. - Chin/cheek: start at the centre of the chin and perform strokes |
|
|
|
|||
|
5. |
Vertical |
- Underside of the chin: keeping the clients head sideways, - Chin: from the centre of the chin to the lower lip - Cheek: From the edge of the jaw to below the eye or to the temple |
|
|
|
|||
|
6. |
Erase |
- If required: crow’s feet |
|
|
|
|||
|
7. |
Erase |
- If required: Nasolabial fold |
|
|
|
|
|
III Nose - right side, then left side |
|
8. |
Vertical |
- Start from the tip of the nose and work upwards to the top of the nose. To build up skin tension, apply pressure to the tip of the nose - Trace the area of the nostrils. |
|
|
|
|
|
IV Lips & centre of the face - right side, then left side |
|
9. |
Horizontal |
- Contour the lips by starting at the middle of the top lip. Repeat on the bottom lip. To create skin tension, turn the lips inwards |
|
|
|
|||
|
10. |
Vertical |
- Start at the centre of the mouth and move upwards to the nose and the inner corner of the eye |
|
|
|
|
Finally, check the overall result and rework any areas of skin that do not appear to have been optimally treated. |
WORKING METHOD
3 WORKING METHOD
|
|
Microdermabrasion - Neck |
|
Right side, then left side To avoid exerting direct pressure on the larynx, position the head to the side |
|||
|
1. |
Horizontal |
Position the head sideways. Start from the centre of the neck and work outwards |
|
|
|
|||
|
2. |
Vertical |
Position head back to the centre. Start from the collarbone and move upwards to jawline. Let the head stretch slightly upwards in a lateral position to help create skin tension |
|
|
|
|||
|
3. |
Erase |
If required: Neck folds |
|
|
|
|||
|
Finally, check the overall result and rework any areas of skin that do not appear to have been optimally treated. |
|||
|
|
Microdermabrasion - Décolleté |
|
Right side, then left side |
|||
|
1. |
Horizontal |
Start at the centre of the sternum and work outwards |
|
|
|
|||
|
2. |
Vertical |
Start at the base of the breast and work upwards to the collarbone |
|
|
|
|||
|
3. |
Erase |
If required: breast fold & décolleté folds |
|
|
|
|||
|
Finally, check the overall result and rework any areas of skin that do not appear to have been optimally treated. |
|||
|
|
Microdermabrasion - Scars |
|
Vacuum intensity and number of repetitions depends on the location of the scar, scar type (flat or raised) and individual sensitivity. Stretch the skin intensively and work slowly and concentrated as follows: |
||
|
1. |
Go over the edges of the scar with 1-3 repetitions. |
|
|
for acne scars |
in a circle around the scar |
|
|
for flat scars / stretch marks |
in long, concentrated strokes around the scar |
|
|
2. |
Treat the scar in a zig-zag pattern. Always move from the undamaged tissue over the scar tissue and back to the undamaged tissue. 1-3 repetitions. |
|
|
3. |
Work directly on the scar with as many repetitions as necessary until lymph flow occurs. |
|
|
for acne scars |
in small circles |
|
|
for flat scars / stretch marks |
back and forth in slow strokes |
|
|
4. |
Go over the edges of the scar with 1-3 repetitions. |
|
|
for acne scars |
in a circle around the scar |
|
|
for flat scars / stretch marks |
in long, concentrated strokes around the scar |
|
|
Finally, check the overall result and rework any areas of skin that do not appear to have been optimally treated. |
||
WORKING METHOD
3 WORKING METHOD
Ceramic Microdermabrasion – for the Ultra-Glow
The aim of Ceramic Microdermabrasion is to increase the radiance, velvety texture, and glow of the complexion immediately after Microdermabrasion with Ionic Crystals.
For this step, Ceramic Crystals are inserted into the device using a separate adapter.
The application of Ceramic Microdermabrasion is generally limited to the face and is performed on the:
- Forehead
- Cheeks
- Nose
- Mouth
- Chin
Similar to the application technique involving ion crystals.
A separate wrinkle treatment with erasing is not necessary.
Ceramic Microdermabrasion can also be extended to the neck and décolleté on request.
Treatment frequency
Visible results can be seen after just one treatment with BABOR MICRODERMABRASION.
The results can be significantly increased by repeated applications over e.g. 6 - 10 treatments at a regular frequency of at least 7 to a maximum of 14 days. If the skin is visibly stressed at the end of the treatment, the frequency of visits can also be increased to 21 days.
The number and frequency of treatments required to achieve optimum results depends on the individual skin type and condition and the treatment objective.
To maintain the results after a treatment course, we recommend a treatment with BABOR MICRODERMABRASION every 4 - 6 weeks.
A break of approx. 3 months should be observed between two treatment courses with BABOR MICRODERMABRASION.
WORKING METHOD
At least 50 MINUTES (pure treatment time)
- Depending on the complexity (face, neck / décolleté) and the choice of care steps after Microdermabrasion, the treatment takes between 50 - 95 minutes.
- Steps 4, 5 and 6 around Microdermabrasion are fixed; steps marked “Optional” can be omitted.
- Immediately after Microdermabrasion, only use serums that are suitable for direct follow-up care; please refer to the DOCTOR BABOR & DOCTOR BABO PRO Beauty Guides for more information. Eye care, creams and masks can be freely selected to suit the skin’s appearance, condition, and treatment objective, unless otherwise stated in the guide.
|
|
Before the treatment |
|
Medical history/consultation and skin analysis with the Derma Visualizer |
|
Information and education on BABOR MICRODERMABRASION - Explain and provide information sheet - Fill out the contraindication form and have it signed |
|
|
Treatment procedure |
|
Preparation |
Prepare warm (38 - 42°C) and cool (14 - 18°C) compress water. Fill the fresh crystal container. |
||||||
|
Steps |
|
Expert Method |
Product |
Notes |
|||
|
1.. |
Grounding Ritual |
– |
|||||
|
2.. |
Deep Cleansing Ritual (Cleansing) |
5 |
|
|
BABOR Cleansing Product & Toner suitable to skin type/condition |
According to skin appearance/condition |
|
|
3. |
Vitality Analysis & Boost (skin activation & |
5 |
|
|
Skin Activator Gel (Rich Vitalizing Mask) |
||
|
4. |
Preparation for MDA: Double Peeling & Tonic |
15 |
Peeling Liquid |
Apply to a dry cotton pad and smooth evenly over the skin. Allow the liquid to take effect briefly. |
|||
|
Peeling Mask |
Apply a thin layer of the mask and leave Meanwhile: Scalp massage Using a cotton pad wrapped in gauze, remove the dry mask off the skin. |
||||||
|
Ultimate Tonic (49.8%) |
The skin should be dry and oil-free. Protect the customer’s eyes and ears by - Head wrap and/or headband - Eye pads Put on disposable gloves. Apply Ultimate Tonic to a cotton pad and spread evenly over the skin. |
||||||
|
5. |
Ionic MDA Face Optional: Neck / décolleté |
10 – 20 |
Ionic Crystals (Insert adapter with “ON” facing outwards) |
Intensity according to skin sensitivity. Observe chapter 3. At the end: If no Ceramic Microdermabrasion is carried out afterwards, vacuum off residual crystals or fan them dry with 2 cosmetic tissues. Then cleanse the skin with a damp sponge. |
|||
|
Optional: + Ceramic MDA |
10 |
Ceramic Crystals (Insert adapter with “ON” facing outwards) |
Intensity: 4 At the end: Remove residual crystals off the skin with 2 dry cosmetic tissues. Then cleanse the skin with a damp sponge. |
||||
|
6. |
After the MDA Optional: + Cleansing |
Rebalancing Liquid |
|||||
|
7. |
Lymphatic Activation & Active Infusion (active ingredient concentrate) |
4 |
|
DOCTOR BABOR / PRO Active Ingredient Concentrate |
According to skin appearance/condition & treatment goal. Note suitability according to MDA from product descriptions! |
||
|
8. |
Optional: Eye care |
2 |
BABOR Eye Care |
According to skin appearance/condition & treatment goal. Apply generously and work in. |
|||
|
Optional: Face Sculpting Massage and/or Mask |
|||||||
|
9. |
Face Sculpting Massage (Massage) |
10 – 20 |

|
1. Introduction |
|||
|
BABOR Massage Cream |
2. Deep muscular relaxation (& PPM) According to skin appearance/condition & treatment goal |
||||||
|
3. Intensive decongestion According to skin appearance/condition & treatment goal |
|||||||
|
10. |
Mask |
10 – 18 |
|
BABOR Mask |
|
8 - 15 minutes According to skin appearance/condition & treatment goal Meanwhile: Hand massage with BABOR Energizing Hand & Manicure Cream Remove cream mask with |
|
|
11. |
Final care |
1 |
BABOR eye care & finishing care & DOCTOR BABOR SOLAR DEFENSE with mineral light protection filter if required |
According to skin appearance/condition & treatment goal |
|||
|
12. |
Reawakening Ritual |
– |
|||||
TREATMENT PROCEDURE
4 TREATMENT PROCEDURE
TREATMENT PROCEDURE