Start
|
|
Table of concents
|
SkinFusor |
||||
|
1. |
4 |
|||
|
2. |
4 |
|||
|
3. |
4 |
|||
|
4 |
||||
|
4 |
||||
|
4 |
||||
|
4 |
||||
|
5 |
||||
|
5 |
||||
|
5 |
||||
|
5 |
||||
|
5 |
||||
|
Selection of BABOR ampoules, serums and active ingredient concentrates |
6 |
|||
|
4. |
7 |
|||
|
5. |
8 |
|||
|
6. |
8 |
|||
|
7. |
9 |
|||
|
8. |
13 |
|||
|
13 |
||||
|
13 |
||||
|
13 |
||||
|
4. Gentle vacuum for specific skin areas and treatment techniques |
14 |
|||
|
15 |
||||
|
9. |
16 |
|||
|
10. |
17 |
|||
|
11. |
Completion of the SkinFusor treatment - selection of BABOR masks |
19 |
||
|
12. |
19 |
|||
|
13. |
20 |
|||
|
|
||||
1. What is the SkinFusor?
The SkinFusor combines 4 sophisticated professional technologies that build on each other to create an effective high-performance treatment for demanding skin.
I. CleanFusion – Deep cleaning
II. PolishFusion – Refinement & Clarification
III. HydroFusion – Powerful supply of active ingredients
IV. ImpulseFusion – Dynamic impulse massage
Each of the 4 treatment steps is carried out with a separate handpiece including a special attachment. Each handpiece has a vacuum system that pulls the skin towards the respective special attachment in a controlled manner. At the same time, active ingredient essences tailored to the respective technology are precisely applied to the skin via each handpiece. The active ingredient essences flow around the special attachment in the handpiece and moisten the skin in optimal doses. In this way, the device merges with the 4 professional technologies and the active ingredient essences to create a unique interplay of technology and cosmetic product.
Professionally applied, the SkinFusor achieves visible and noticeable results after just one application and brings out the natural beauty of every demanding skin in all its facets.
|
|
Treatment with the SkinFusor is suitable for all skin types, especially for the following objectives: |
|
- Optical reduction of lines and wrinkles - Support of tissue strength and elasticity - Clarification of the complexion - Pore refinement - More even skin texture - Increase in luminosity and radiance |
|
The special CleanFusion brush attachment (Silicon Brush) in combination with the vacuum technology and CleanFusion Essence removes dirt from the skin surface and intensively dissolves deep-seated impurities and deposits from the pores; at the same time, dissolved dirt particles including excess cleansing essence are sucked up and directed into the collection container. The CleanFusion technology thus ensures - following a manual BABOR cleansing - an effective, optimally tolerated deep cleansing and prepares the skin ideally for the subsequent PolishFusion. |
|
The special PolishFusion attachment (Polish Pad) in the handpiece in combination with the vacuum technology and the effective PolishFusion Essence with fruit acid efficiently and evenly removes dead skin cells. In addition, the vacuum draws out softened, dissolved impurities and sebum deposits from the pore structure. Removed horny cells, impurities and excess peeling essence are immediately suctioned off and directed into the collection container. PolishFusion technology refines the skin texture, clarifies the complexion and ideally prepares the skin for the subsequent HydroFusion. |
|
The skin is drawn to the low-frequency transducer (25 KHz; 0.6 W/cm²) in the handpiece using vacuum technology, ensuring perfect, continuous skin contact. At the same time, the HydroFusion essence flows around the transducer in an optimal dosage. In this way, the particularly effective power of low sound technology is fully utilized. Compared to classic cosmetic ultrasound applications with 1 - 10 MHz, low frequency ultrasound with 25 KHz is characterized by a significantly higher fluctuation amplitude (i.e. particle movement through the amplitude). This strong physical mass deflection causes a strong compression and decompression of the skin tissue and can therefore increase the skin's ability to absorb active ingredients. In addition, low-frequency sound creates cavitation impulses that atomize the HydroFusion Essence into the finest, rapidly accelerated micro-droplets. Thousands of atomized micro-droplets hit perfectly prepared skin and intensively moisturize it. The HydroFusion technology, for intensive skin smoothing and optimized moisturization, is the optimal preparation of the skin for the subsequent supply of active ingredients with ImpulseFusion. |
|
In 2 coordinated massage sequences, the pulsating vacuum acts on the skin like an intensive fitness workout. Within one second, the tissue is lifted and released up to 12 times, comparable to ultra-fine, lightning-fast plucks. The rapid alternation of suction and release as well as the special surface structure of the ImpulseFusion Basic Cap stretches and compresses the tissue at top speed. The result is a mechanical impulse massage unique to BABOR, which stimulates the skin with an intensity that cannot be achieved with a manual massage. This is because all tissue layers of the skin, including the underlying SMAS (superficial musculo-aponeurotic system), are intensively and evenly trained and activated. The SMAS is a special layer of muscle/connective tissue under the skin. Connected to the dermis via connective tissue strands, its composition is decisive for a youthful, smooth appearance of the skin. The intensive power workout of ImpulseFusion with its strong and fast stretching and compression impulses, inspired by physiotherapy, puts targeted strain on the tissue and can thus exert a stimulating signal effect on the fibroblasts in the connective tissue. In addition, the circulation of fluids in the tissue and blood flow to the skin is supported as the basis for an optimal supply of oxygen and nutrients, a positive stimulus for the cell activity and metabolic activity of the skin. |
|
Steps of ImpulseFusion ImpulseFusion builds on each other in the following 2 massage sequences: |
|
|
|
1. Step 1 - Active ingredient push |
|
A BABOR ampoule / a BABOR active ingredient concentrate is applied manually and worked into the skin with precise tapping impulses to match the skin's appearance / condition. The focus here is on the optimal incorporation of individually selected active ingredient ampoules/concentrates. |
|
|
2. Step 2 - Intensive massage |
|
Strong, intensive and fast stretching and compression impulses ensure an intensive workout for all tissue layers. |
The ImpulseFusion Essence applied in doses via the handpiece in massage step 2 supports the skin's natural protective barrier thanks to the skin-identical ceramides it contains and helps to retain previously applied active ingredients in the skin.
Selection of BABOR ampoules, serums and active ingredient concentrates
A large selection of BABOR products is suitable for carrying out the active ingredient push. Choose according to your skin care goals and individualize your SkinFusor treatment.

|
|
AMPOULE CONCENTRATES |
|
Algae Vitalizer |
|
||||||||
|
Hydra Plus Boost |
|
||||||||
|
Collagen Booster |
|
||||||||
|
3D Firming |
|
||||||||
|
Perfect Glow |
|
||||||||
|
Multi Vitamin |
|
||||||||
|
SOS Calming |
|
||||||||
|
Active Purifier |
|
|
|
ANTI-AGING |
|
HSR lifting serum |
|
|
|
|
DOCTOR BABOR |
|
10D Hyaluronic Ampoule Serum Concentrate |
|
||||||||
|
ECM Repair Serum |
|
|
|||||||
|
Derma Filler Serum |
|
|
|||||||
|
Complexion Perfecting Serum |
|
||||||||
|
Dark Spot Correc. Concentrate |
|
||||||||
|
Itch Relief Serum |
|
|
|
DOCTOR BABOR PRO |
|
HA – Hyaluron |
|
||||||||
|
A – Retinol |
|
|
|||||||
|
C – Vitamin C |
|
|
|
|
|||||
|
PEP – Peptides |
|
||||||||
|
FR – Ferulic Acid |
|
|
|||||||
|
BA – Boswelia |
|
|
|
|
|||||
|
EGF – Growth Factor |
|
|
|
||||||
|
BG – Beta Glucane |
|
|
As with any cosmetic treatment, only healthy people with healthy skin may be treated with the SkinFusor by appropriately trained beauticians.
In certain cases, the use of the various technologies is contraindicated in general, locally limited or until normal health has been restored. The following list shows the most common contraindications.
If in doubt, you should always consult the specialist treating you.
Localized contraindications:
Skin areas with
- Skin damage (e.g. open wounds, localized inflammation)
- Visible skin changes (e.g. warts)
- Moles and birthmarks
must be generously omitted during the application of all 4 technologies.
Treatment with SkinFusor is generally contraindicated in the following cases:
- Skin diseases
- Autoimmune diseases, immune insufficiency
- Cancers, malignant tumors
- Keloids or a predisposition to kelloid formation
- Long-term use of cortisone, Marcumar, glucocorticoids, warfarin, heparin, salicylic acid, aspirin or other blood-thinning medication
- Taking anti-acne medication (e.g. Roaccutane in the last 12 months)
- Pregnancy or breastfeeding
- Under the influence of alcohol or drugs
In the following cases, treatment with SkinFusor is contraindicated until normal health has been restored:
- Acute fever, infectious diseases
- Acute herpes in the area to be treated
- Acute intake of cortisone, Marcumar, glucocorticoids, warfarin, heparin, salicylic acid, aspirin or other blood-thinning medication
The following cases are temporary contraindications:
- after chemical peelings, peeling treatments
- after a fruit acid peeling treatment at the beautician: at least 2 weeks break
- after TCA peeling / phenol peeling: at least 6 - 8 weeks break
- after ablative laser treatments at the dermatologist: at least 6 - 8 weeks break
- after cosmetic surgery, injections: Consultation with the specialist
Special contraindications for the use of HydroFusion
HydroFusion must not be used:
- for heart diseases and pacemakers
- for metal implants in the area to be treated
HydroFusion is designed exclusively for the treatment of the face, neck and décolleté. Please do not treat the eyes, eyelids or the thyroid area on the neck.
In general, allergic reactions to the cosmetic products used may occur when using the SkinFusor.
5. CleanFusion & PolishFusion attachments
The CleanFusion Silicone Brush and the PolishFusion Polish Pad are disposable attachments that must be disposed of with household waste after use.
|
|
The CleanFusion Silicon Brush is made of high-quality, soft silicone. The special arrangement and length of the bristles enable optimum cleaning performance. |
|
Place the silicone brush over the stainless steel stamp in the handpiece before use. After use, remove the silicone brush from the stainless steel stamp and dispose of it. |
|
|
The PolishFusion Polish Pad is an adhesive pad coated with special crystals, the homogeneous grain of which ensures a uniformly intensive peeling result. |
|
Stick the polish pad onto the stainless steel stamp in the handpiece immediately before use. To do this, remove the adhesive plate from the backing material, place it on the dry, grease-free (important!) stainless steel stamp and press it on for approx. 3 seconds so that the adhesive bonds optimally with the handpiece. After use, remove the Polish Pad from the stainless steel stamp and dispose of it. |
All 4 Fusion technologies are equipped as standard with a basic polycarbonate handpiece attachment for flat work.
The CleanFusion and PolishFusion can be converted to the narrower Advanced Cap for localized treatment of specific areas of skin.
The CleanFusion, PolishFusion and HydroFusion attachments can be easily attached and removed by turning them slightly; with the ImpulseFusion, place the polycarbonate attachment straight onto the two holes in the middle.
All SkinFusor treatment steps always start with the Basic handpiece guide.
Depending on the mechanical sensitivity of the skin, the condition of the connective tissue and the treatment goal, an additional advanced treatment technique can be used for each of the 4 technologies.
SkinFusor Basic handpiece guide - for all 4 technologies
Position the client's head for the treatment of each facial area so that you can work optimally.
Always guide the handpiece from the center outwards without applying pressure in long, continuous strokes.
At the same time, follow the course with your free hand to keep the skin taut.
Build up skin tension on the neck and décolleté by positioning the head correctly and moving individual areas of skin.
For an even treatment result, work slightly overlapping and always follow the face shape/bend with the handpiece!
Always treat the right side first, then the left side.
If possible, work on the right side with the right hand and the left side with the left hand.
Ideal working speed for optimum results
Note the ideal working speeds according to technology:
|
Technology |
Speed |
Remember! |
|
|
HydroFusion |
Extremely slow |
|
Snail's pace |
|
ImpulseFusion – Step 2 |
Very slow |
Twice as fast as snail's pace |
|
|
ImpulseFusion – Step 1 |
slowly |
Three times faster than snail's pace (Run handpiece) |
|
|
Clean & PolishFusion |
slightly faster |
concentrated; slightly faster than ImpulseFusion - Step 1 |
What must be observed before fitting the handpiece?
1. Press the Fill up function (holding the handpiece closed) so that the tube is completely filled with essence.
2. Before placing the handpiece on the skin, make sure that no liquid flows uncontrollably onto the skin.
3. Start the first application step with a gentle vacuum and medium supply of active ingredient to observe the skin and customer reaction. If necessary, readjust as described in 8.3.
|
|
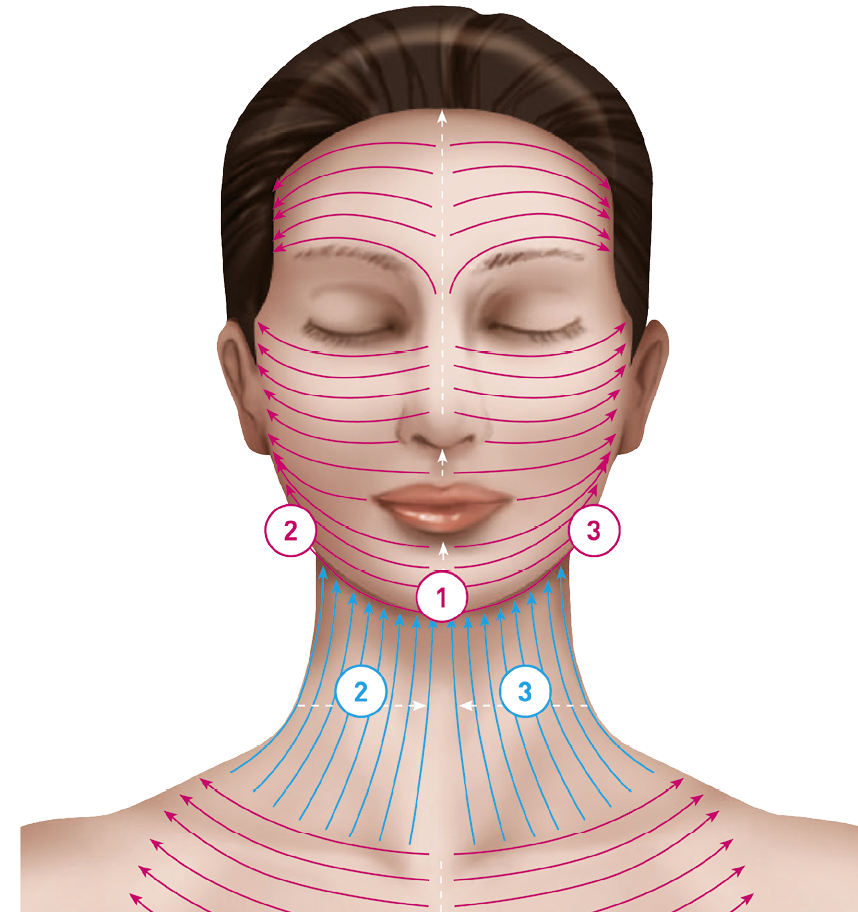
Face |
|
1. Working direction: from chin to forehead |
|
Start at the tip of the chin and work outwards from the center of the face, overlapping strip by strip. In the lower part of the face, the lines end in front of the ears, on the forehead at the temples. With CleanFusion and PolishFusion, integrate the nose into the pathways, with HydroFusion and ImpulseFusion, place it next to the nose. Include the area between the eyebrows on the forehead. |
|
|
|
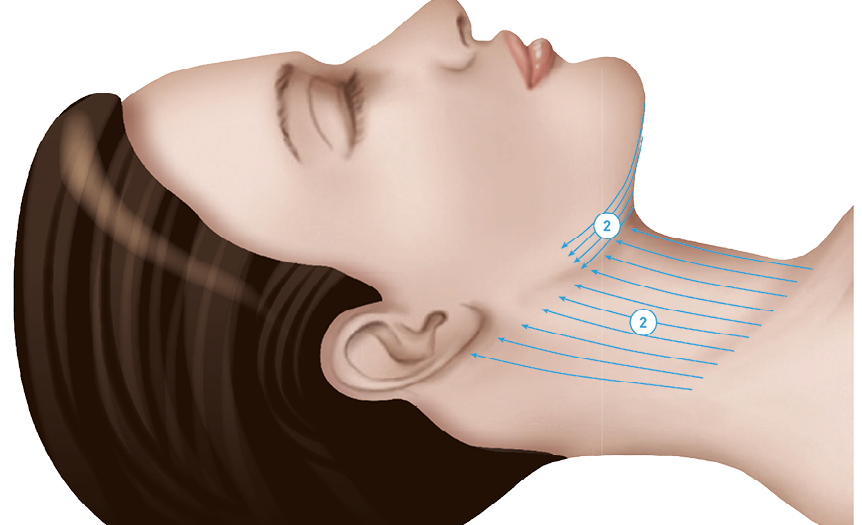
Neck incl. area below the chin |
|
2. & 3. Sequence: first under the chin, then the neck |
|
Vacuum: gentle adjustment Start in the middle below the chin and work outwards, overlapping panel by panel. Then work up the neck from the base of the neck (collarbone) to the top (jawline), lane by lane. Start on the side of the neck and work overlapping towards the middle of the neck. |
|
|
|
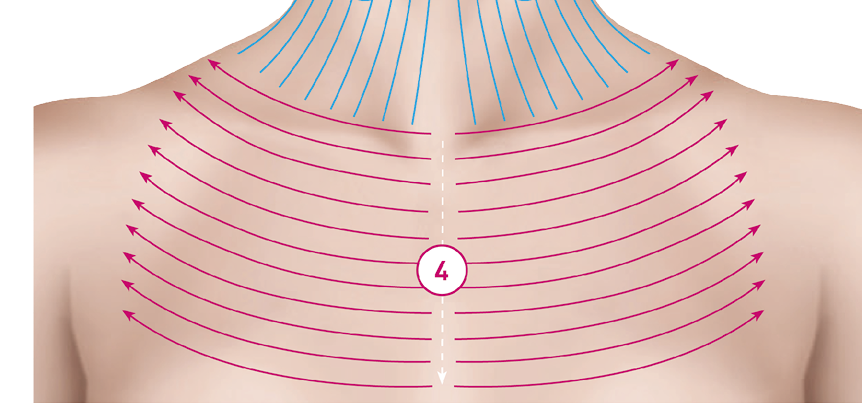
Neckline |
|
4. Working direction: from the collarbone to the base of the breast |
|
Start in the middle at the level of the collarbone and work outwards, overlapping panel by panel. |
|
Important notes on handpiece guidance
General
Move the handpiece of each Fusion technology continuously on the skin and never stay on one spot for a long time.
HydroFusion
Do not treat beyond the eye socket during HydroFusion and avoid the area of the thyroid gland in the middle of the neck.
|
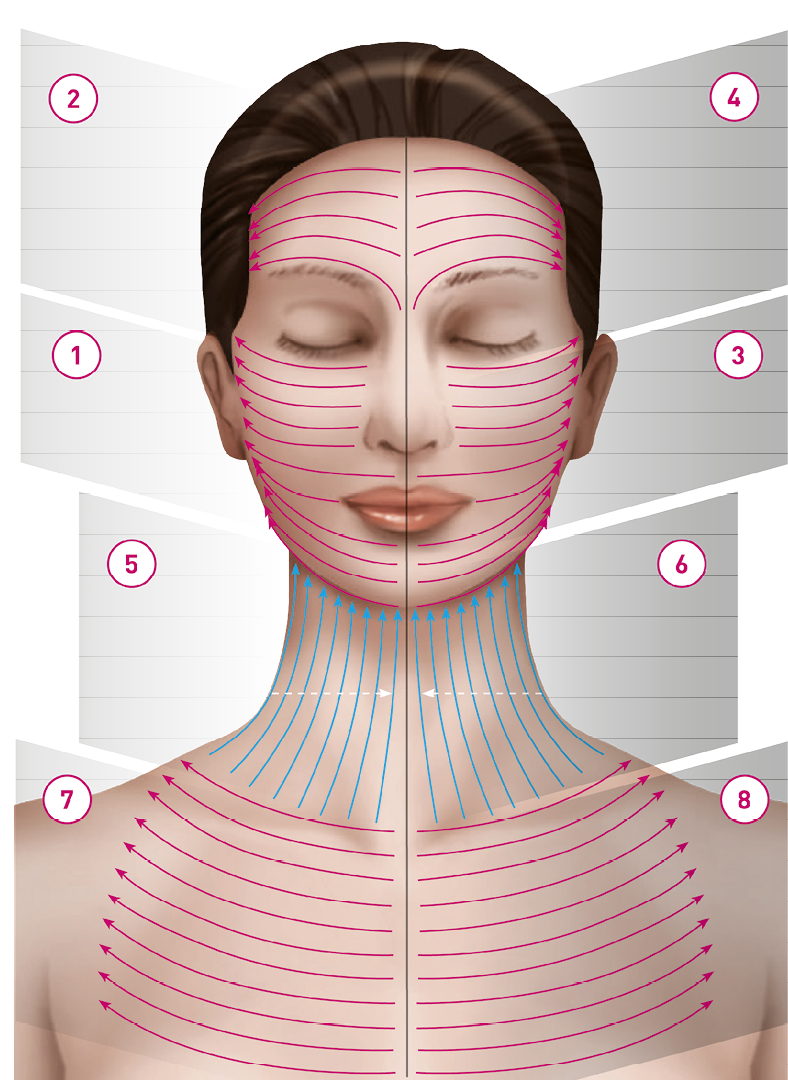
HydroFusion & ImpulseFusion |
Application sketch HydroFusion |
|
Before HydroFusion is carried out, the skin must be intensively moisturized with HydroFusion Essence in order to ensure a constant release of active ingredients and NF sound power to the skin. Before performing ImpulseFusion - Step 1, the skin must first be moisturized with a BABOR ampoule / active ingredient concentrate that matches the skin's appearance / care goal, as ImpulseFusion - Step 1 is performed without the addition of active ingredients via the SkinFusor. Please apply the HydroFusion Essence or all BABOR ampoules / active ingredient concentrates partially in the following order and then work them in immediately using the Basic handpiece guide: 1. Right chin and cheek area 2. right forehead area 3. Left chin and cheek area 4. Left half of forehead 5. Right side of the neck including the area below the chin 6. Left side of the neck including the area below the chin 7. right cleavage half 8. left cleavage half
|
|
|
|
SkinFusor Advanced handpiece guides All 4 technologies provide for 2 time windows each (short & long). You can intensify the treatment result by selecting the longer time window - always taking into account the mechanical sensitivity or the condition of the connective tissue of the skin. For each technology, the following additional treatment techniques can usefully supplement the SkinFusor Basic handpiece guide: |
|
I - CleanFusion |
II - PolishFusion |
||||
|
FACE, NECK & DÉCOLLETÉ |
|||||
|
4 minutes |
6 minutes |
4 minutes |
6 minutes |
||
|
1. |
Basic |
Basic |
1. |
Basic |
Basic |
|
End |
+ |
End |
+ |
||
|
2. |
Advanced with Advanced Cap Aim: Dissolving deep-seated impurities Vacuum: gentle adjustment 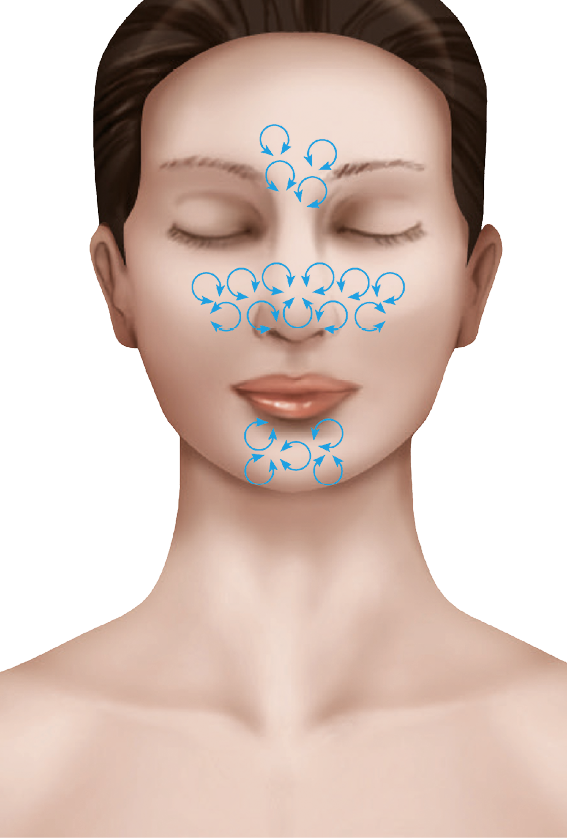
Slow, concentrated back and forth rotation of the handpiece on subsequent sections without loss of vacuum: 1. Tip of the nose and nostrils 2. Area next to nose to center of face 3. Forehead area incl. glabella 4. Chin section |
2. |
Advanced with Advanced Cap Aim: Extraction of impurities
Slow, concentrated back and forth rotation of the handpiece on subsequent sections without loss of vacuum: 1. Tip of the nose and nostrils 2. Area next to nose to center of face 3. Forehead area incl. glabella 4. Chin section |
||
|
End |
End |
||||
|
III - HydroFusion |
IV - ImpulseFusion |
||||
|
FACE, NECK & DÉCOLLETÉ |
|||||
|
22 minutes |
30 minutes |
STEP 1 - Keine Zeitwahl |
|||
|
1. |
Basic |
Basic |
1. |
Basic - partial application of selected BABOR ampoule / active ingredient concentrate |
|
|
End |
+ |
+ |
|||
|
2. |
Advanced Objective: Optical plumping of lines and wrinkles Vacuum: gentle adjustment 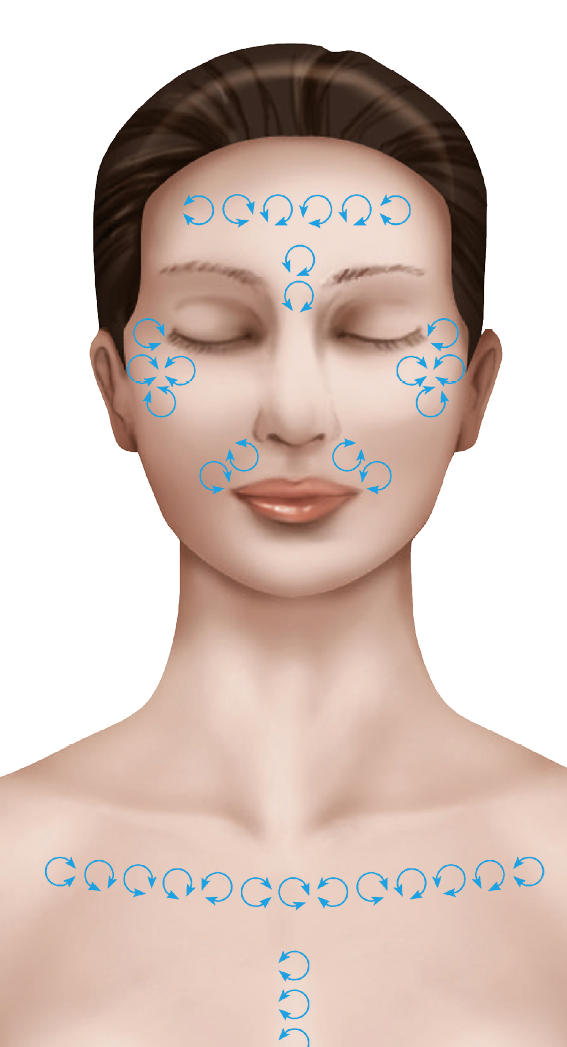
Slow, concentrated back and forth rotation of the handpiece on subsequent sections without loss of vacuum: 1. Lateral eye wrinkles / crow's feet 2. Frown line 3. Forehead wrinkles 4. Nasolabial folds 5. Décolleté folds 6. Breast crease |
STEP 2 |
|||
|
8 minutes |
12 minutes |
||||
|
1. |
Basic |
Basic |
|||
|
End |
+ |
||||
|
2. |
Advanced Goal: Workout intensification Vacuum: gentle adjustment 
Slow, concentrated circles from the inside out: 1. Cheek sections 2. Neckline |
||||
|
End |
End |
||||
|
|
Regulates how much essence is applied to the skin via the handpiece. The optimum setting is when |
|
|
- the handpiece can be guided comfortably over the skin, ensuring a good glide path - no excessive flow drops occur To make application easier, the SkinFusor already contains common values for "low" / "medium" / "high" active ingredient supply. We always recommend the medium setting at the start of treatment. If necessary, manual readjustment is possible at any time. Never work dry without adding active ingredients. |
|
2. Parameters for regulating the application intensity The intensity of the application can be regulated using the following parameters, depending on the technology: |
|
|
|
Vacuum |
|
|
Regulates how strongly the skin is sucked onto the corresponding handpiece attachment. The higher the vacuum, the more intensive the effect of the respective technology on the skin. Common values for "gentle" / "medium" / "strong" are already stored in the SkinFusor to make application easier. |
|
Duration of application |
|
|
All 4 fusion technologies provide for 2 different time windows (short & long), which should not be exceeded if possible. The long time windows provide additional time for local, intensive treatment of certain skin areas with the Advanced handpiece guide. |
|
|
Use your client's mechanical skin sensitivity as a guide to find the optimum setting for the vacuum and application time. The vacuum is optimal when there is a slight to medium reddening of the skin immediately after the first strokes with the handpiece. If the skin is vascularly labile, always select the gentle vacuum setting and the short application time! After completion of the PolishFusion, an intensive, extensive reddening may occur. |
|
Vacuum |
||
|
soft |
medium |
strong |
|
mechanically sensitive vascularly labile skin |
normally sensitive |
robust |
|
Duration of application |
||
|
short |
long |
long |
|
III & IV – HydroFusion & ImpulseFusion |
|
|
Use the condition of the skin's connective tissue as a guide to determine the optimum setting for the vacuum and the duration of application. With HydroFusion, ensure that the skin tissue is visibly pulled towards the low pressure transducer in the handpiece. If the skin is vascularly labile, always select the gentle vacuum setting and the short application time! |
|
Vacuum |
||
|
soft |
medium |
strong |
|
Weak, sagging connective tissue vascularly labile skin |
Normal, soft connective tissue |
firm connective tissue |
|
Anwendungsdauer |
||
|
short |
long |
normal |
|
|
4. Gentle vacuum for specific skin areas and treatment techniques Always select the gentle vacuum setting for the following skin areas or treatment techniques (chapter 6): |
|
|
- Basic handpiece guidance on the neck across all 4 technologies - Advanced handpiece guidance with Clean- and PolishFusion - Advanced handpiece guidance with HydroFusion - Advanced handpiece guidance with ImpulseFusion |
|
|
The display on the SkinFusor shows the areas to be gently treated with the corresponding handpiece guide in blue. See also the following table of values for the ideal setting for vacuum and application time! |
|
I & II – CleanFusion & PolishFusion |
||||
|
Mechanical skin sensitivity |
sensitive / vascularly labile |
normal |
robust |
|
|
Duration of application |
||||
|
4 minutes |
6 minutes |
6 minutes |
||
|
Handpiece guide |
Skin area |
Vacuum |
||
|
Basic |
Face & décolleté |
soft |
medium |
strong |
|
Basic |
Neck |
soft |
||
|
Advanced |
Nose, next to nose, chin & forehead |
/ |
soft |
|
|
III – HydroFusion |
||||
|
Connective tissue condition |
weak vascularly labile |
normal |
firm |
|
|
Duration of application |
||||
|
short |
long |
long |
||
|
Handpiece guide |
Skin area |
Vacuum |
||
|
Basic |
Face & décolleté |
soft |
medium |
strong |
|
Basic |
Neck |
soft |
||
|
Advanced |
local wrinkles |
/ |
soft |
|
|
IV – ImpulseFusion |
||||
|
Connective tissue condition |
weak vascularly labile |
normal |
firm |
|
|
Step 1 |
||||
|
Handpiece guide |
Skin area |
Vacuum |
||
|
Basic |
Face & décolleté |
soft |
medium |
strong |
|
Basic |
Neck |
soft |
||
|
Step 2 |
||||
|
Duration of application |
||||
|
8 minutes |
12 minutes |
12 minutes |
||
|
Handpiece guide |
Skin area |
Vacuum |
||
|
Basic |
Face & décolleté |
soft |
medium |
strong |
|
Basic |
Neck |
soft |
||
|
Advanced |
Cheeks & décolleté |
/ |
soft |
|
|
All settings can be adjusted manually at any time if required. |
||||
9. What can happen during / after the SkinFusor treatment?
As a rule, treatments with the SkinFusor are very well tolerated and only lead to undesirable reactions in exceptional cases.
The following side effects or reactions may occur in individual cases:
- Bleeding into the tissue in the case of weak connective tissue or vascularly unstable skin; this usually disappears after a few days.
Tip:
To prevent bleeding, always ensure that the handpiece glides well over the skin by applying sufficient active ingredients and never work too dry!
- In the case of impure skin, an initial aggravation may occur after the first application; in this case, a treatment course including professional cleansing is recommended in order to clear and stabilize the complexion in the long term.
- The skin is very receptive after a SkinFusor treatment and needs a lot of moisture and sufficient lipids in the following days; therefore, give suitable care recommendations for at home immediately after the treatment.
|
1. |
Medical history/consultation interview and skin analysis with the Derma Visualizer |
|
|
2. |
Information & clarification on SkinFusor treatment |
|
|
Ask for contraindications and have them signed. |
||
|
3. |
Preparation |
Prepare warm (38 - 42°C) and cool (14 - 18°C) compress water. Place the CleanFusion Silicon Brush over the stainless steel stamp in the handpiece. |
|
4. |
Grounding Ritual |
|
|
5. |
Deep Cleansing Ritual (cleansing) |
Selection of cleanser and toner to suit skin type/condition Remove cleansing with hydro-therapy stimulation. |
|
6. |
Manual and visual skin diagnosis |
|
|
7. |
For hygienic reasons, wear disposable gloves. |
|
|
8. |
I - CleanFusion |
With BABOR TECH CleanFusion Essence 1. Time selection 2. Fill up button (while holding the handpiece closed) 3. Vacuum setting / active ingredient supply 4. CleanFusion version with Basic + Advanced handpiece guide + Advanced Cap, if applicable |
|
9. |
II - PolishFusion |
With BABOR TECH PolishFusion Essence 1. Stick the PolishFusion Polish Pad onto the dry, grease-free stainless steel stamp in the handpiece; press the pad on for 3 seconds. 2. Time selection 3. Fill up button (while holding the handpiece closed) 4. Vacuum setting / active ingredient supply 5. PolishFusion version with Basic + Advanced handpiece guide + Advanced Cap, if applicable |
|
10. |
III - HydroFusion |
With BABOR TECH HydroFusion Essence 1. Select the area to be treated 2. Time selection 3. Fill up button (while holding the handpiece closed) 4. Vacuum setting / active ingredient supply 5. Apply HydroFusion Essence partially and then immediately perform HydroFusion with Basic + Advanced handpiece guidance if necessary. |
|
11. |
IV - ImpulseFusion |
Step 1: With BABOR ampoule / active ingredient concentrate according to care goal (see page 4.) 1. Vacuum setting 2. Partially apply BABOR ampoule / active ingredient concentrate and then immediately perform ImpulseFusion - Step 1 with Basic handpiece guidance. Step 2: With BABOR TECH ImpulseFusion Essence 1. Time selection 2. Fill up button (while holding the handpiece closed) 3. Vacuum setting / active ingredient supply 4. ImpulseFusion version with Basic + Advanced handpiece guide if required |
|
12. |
Mask |
Selection of the mask according to skin type/condition and treatment goal. (see chapter 11.) Application time: 15 minutes Put together the right care package and explain to the customer again exactly how she should care for herself. Remove excess with hydrotherapy stimulation. |
|
13. |
Final care |
Selection of eye & final care according to skin appearance/condition and treatment goal. |
|
14. |
Reawakening Ritual |
|
|
15. |
Cleaning the appliance |
Remove the CleanFusion Silicone Brush and PolishFusion Polish Pad from the handpieces and dispose of them. Remove and disinfect Basic & Advanced Caps. Clean the SkinFusor at the end of the working day in accordance with the technical operating instructions. |
11. Completion of the SkinFusor treatment - selection of BABOR masks
A large selection of BABOR masks is suitable after using the SkinFusor. Choose from the masks listed below according to your skin care goals and use them to individualize your SkinFusor treatment.
|
|
SKINOVAGE |
|
Moisturizing Foam Mask |
|
||||||
|
Calming Mask |
|
||||||
|
Balancing Mask |
|
||||||
|
Vitalizing Mask |
|
|
|
EXPERT SPECIALISTS |
|
Silver Foil Sheet Mask |
|
||||||
|
Lift Effect Mask |
|
||||||
|
Smoothing Sheet Mask |
|
|
|
DOCTOR BABOR/DOCTOR BABOR PRO/ANTI-AGING |
|
Repair & Radiance Mask |
|
|
|||||
|
EGF Cream Mask |
|
|
|||||
|
HSR lifting anti-wrinkle cream mask + |
|
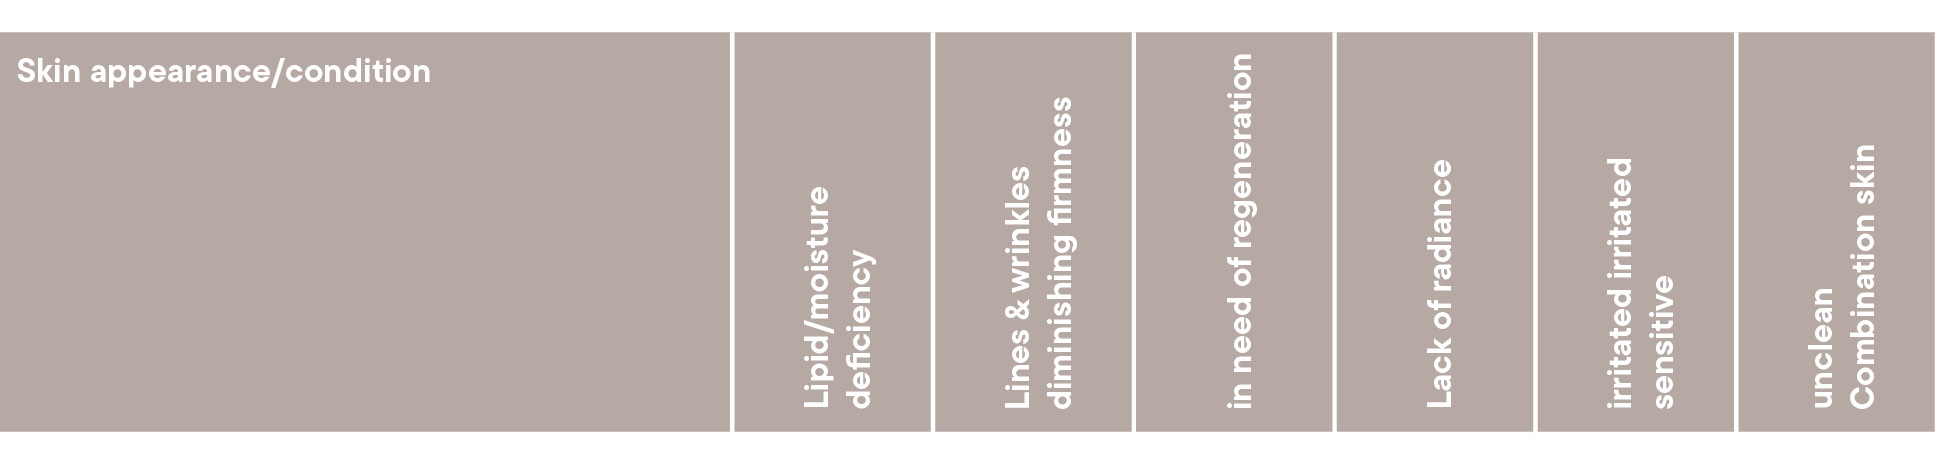
12. Integration into BABOR treatment processes
The following overview shows how you can combine the individual technologies of the SkinFusor with other BABOR treatments & applications.
For all BABOR TECH combinations, please observe the special features of the respective technology and its regulations for safe use.
Do not use Skin Activator Gel (blood circulation mask) during a complete SkinFusor treatment.
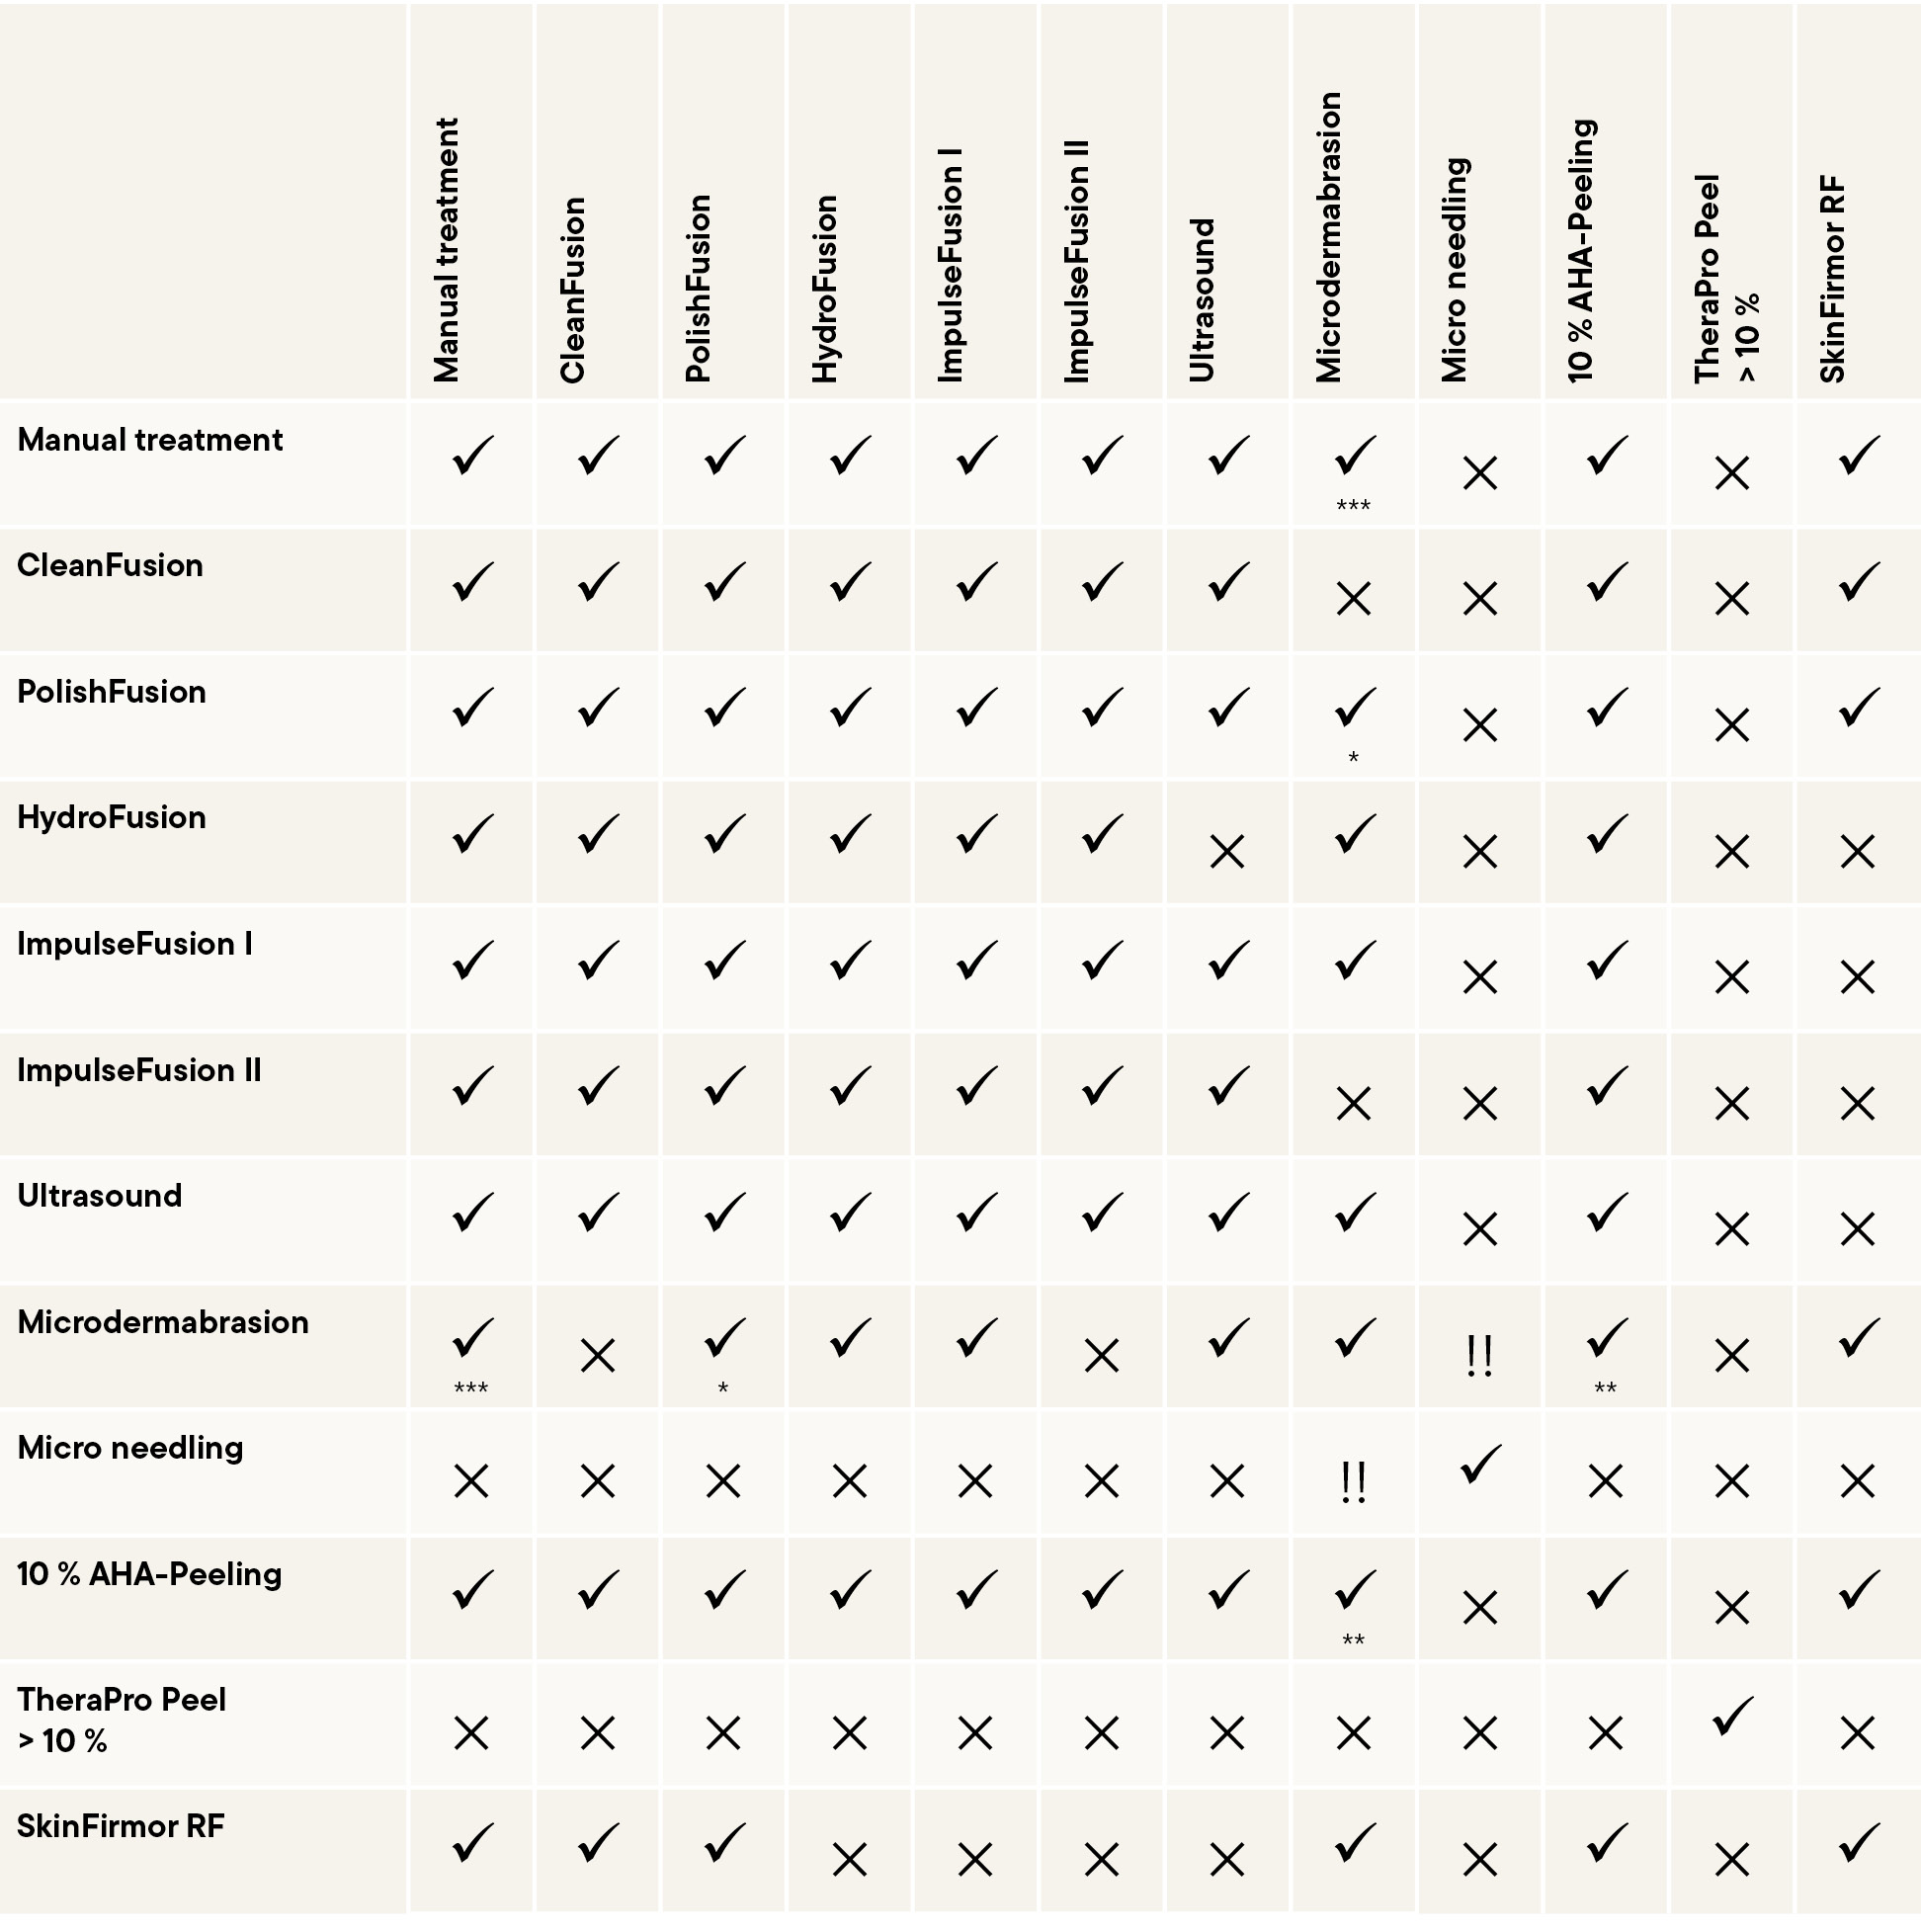
* Execute PolishFusion after MDA
** Perform 10 % AHA according to MDA
*** Apply Peeling Liquid & Mask beforehand; aftercare with serum suitable for MDA
|
Legend |
|
|
|
possible |
|
✕ |
not possible |
|
!! |
only after Profi-Tech seminar |
|
Product name |
Description |
Container size |
|
CleanFusion Silicon Brush |
Disposable attachment for use with the CleanFusion |
50 pieces |
|
PolishFusion Polish Pad |
Disposable adhesive plates for use with the PolishFusion |
50 pieces |
|
Basic Cap Clean & PolishFusion |
Polycarbonate cap for the CleanFusion and PolishFusion handpieces |
1 piece |
|
Basic Cap HydroFusion |
Polycarbonate cap for the HydroFusion |
1 piece |
|
Basic Cap ImpulseFusion |
Polycarbonate cap for the ImpulseFusion |
1 piece |
|
Advanced Cap |
Polycarbonate cap for the Advanced handpiece guide on the CleanFusion and PolishFusion |
1 piece |
|
Cleansing plug |
Cap for placing on the handpieces to start the rinsing program |
1 piece |
|
Tub |
Container for filling with distilled water when cleaning the appliance |
1 piece |