Start
MICRONEEDLING
table of contents
|
THE TOPICS AT A GLANCE |
||||
|
1. |
4 |
|||
|
4 |
||||
|
4 |
||||
|
4 |
||||
|
2. |
||||
|
What should be considered after the MICRONEEDLING TREATMENT? |
||||
|
3. |
||||
|
4. |
||||
|
Guideline values for setting frequency (speed) and intensity |
||||
|
5. |
||||
|
6. |
||||
|
7. |
||||
|
|
|
What is cosmetic microneedling? |
|
Cosmetic microneedling is a gentle, non-invasive anti-aging treatment. After thorough skin preparation, sterile, precision needle modules are used. The fine needles gently and evenly perforate the outermost skin layer for just a moment, allowing selected active ingredients to be delivered exactly where they are most effective. At the same time, this non-invasive stimulation activates skin functions, boosts circulation, and encourages the skin’s natural regeneration. The treatment is completed with an intense e massage using a special hygienically sealed massage module. This relaxes facial muscles and tissue, while further improving the absorption of active ingredients. |
|
Applications |
|
Cosmetic microneedling is versatile and suitable for the following skin concerns: |
|
|
Skin concern |
Treatment goal |
|
wrinkles, loss of elasticity, decreasing skin firmness |
- reduction of wrinkles - increased skin elasticity and firmness |
|
|
irregular, uneven skin texture, enlarged pores |
- even, regular, smooth skin texture - refined pore structure - improvement of skin quality |
|
|
uneven skin tone, pigment irregularities |
- even complexion - even skin tone |
|
|
healed scars / acne scars & acne marks |
- improvement of skin‘s appearance |
|
|
dull, tired, dull-looking complexion |
- increased radiance and glow |
|
|
vascular labile skin |
- reduction of skin redness and visible veins |
|
How does the skin react to the MICRONEEDLING TREATMENT? |
|
The skin reacts immediately to the MICRONEEDLING TREATMENT with moderate to intense redness, similar to sunburn. After the redness has subsided, a slight scab may form in individual cases on particularly intense ely treated skin areas. This too is an entirely intended and calculated skin reaction. |
2 WHAT SHOULD BE CONSIDERED?
|
Contraindications |
|
The following contraindications and side effects result from a careful analysis of the clinical literature for microneedling treatments. If there is even the slightest doubt that the safety of the client cannot be guaranteed, for example due to concomitant diseases, treatment must be refrained from and medical advice must be sought beforehand. Even though cosmetic microneedling is a non-invasive method, BABOR recommends that the following contraindications be observed in the interests of the greatest possible client safety: The use of microneedling is generally contraindicated in the following cases: - Hemophilia / Blood clotting disorders - Uncontrolled diabetes mellitus - Treatment of skin areas with dermatoses, e.g. skin tumours, eczema, exanthema, open wounds, keloids (or in the case - Long-term use of cortisone, Marcumar, glucocorticoids, warfarin, heparin, salicylic acid, aspirin, or other blood-thinning medications - Pathological inflammatory skin conditions, such as neurodermatitis, psoriasis - Cancers and malignant tumors - Epilepsy - Heart disease - Vascular diseases - Circulatory In the following cases, the use of microneedling is temporarily contraindicated until normal health is restored: - Acute intake of blood-thinning agents, e.g. warfarin, heparin, salicylic acid - Taking anti-acne medications with isotretinoin - Systemic infections (e.g. hepatitis or HIV), febrile infections, tuberculosis or acute local skin infections (e.g. with herpes viruses) - Acute conjunctivitis - Acute chemotherapy, radiotherapy or high-dose corticosteroid therapy from 4 weeks before the start of therapy until 4 weeks after the end of therapy - Pregnancy or breastfeeding - Alcohol or drug influence In the following cases, these are temporary, locally limited contraindications: - Skin areas after plastic surgery or filler treatments/injections - Skin areas after laser hair removal treatments less than 2 weeks ago - Skin areas after chemical peeling or peeling in the last 8 weeks Side effects During microneedling treatment, allergic reactions to cosmetic preparations can occur. No further complications are known. The treatment must be stopped immediately in the case of: - excessive pain sensation - excessive leakage of wound fluids - fainting spells / dizziness |
|
What should be considered after the MICRONEEDLING TREATMENT? |
||
|
The skin needs 2 – 3 days to regenerate after the treatment. Optimal treatment success is achieved if additional stimuli are avoided during this time, such as: - sunbeds and prolonged sun exposure - heavy sweating (sauna visits) - swimming pool visits - abrasive or chemical peels - hair removal on the treated areas - self-tanner In addition, on the day of the MICRONEEDLING TREATMENT and also 2 – 3 days afterwards, you should not touch your face with your hands unnecessarily often; Never scratch off any scab that may have formed before it heals naturally. During a microneedling series of treatments, sun protection with a very high sun protection factor is required throughout the day; even after the end of the treatments, sun protection should be worn during the day for another 2 – 3 weeks. |
||
|
Post-application care routine |
||
|
Usually, all skin reactions fade within 1–2 days after treatment. To avoid stressing the skin further, we recommend using fragrance-free skincare products at home, for example from the DOCTOR BABOR PRO line, as follows: |
||
|
Time |
Products |
Hints |
|
Day of the MN |
VITAMIN B CALMING SERUM |
Apply multiple times if needed |
|
Day 1 – 3 to MN |
VITAMIN B CALMING SERUM Daytime: ANTIOXIDANT BALM SPF 50+ Evening: PRO cream according to care goal or HYDRATION RECOVERY OINTMENT |
|
|
From day 4 to MN |
PRO Serum by Care Goal Daytime: ANTIOXIDANT BALM SPF 50+ Evening: PRO cream according to care goal |
|
|
The care routine should be put together individually according to the skin appearance/condition and care goal in order to optimally support the initiated skin regeneration. Products with vitamin C or retinol should only be used in aftercare at home when skin redness or feelings of tightness have completely subsided. |
||
|
|
Important hygiene and safety instructions |
|
In principle, if the required hygiene standards are not followed, BABOR microneedling could, in rare cases, lead to the transmission of infectious diseases if the required hygiene standards are not observed! The following hygiene and safety instructions must therefore be observed and adhered to: |
|
- BABOR microneedling devices may only be used by trained professionals. - To protect against cross-contamination, the operator must wear hygiene gloves. - The entire device and the handpiece must be wiped with a soft cloth soaked in a cleaning disinfectant before use. - The treatment must be carried out in a room suitable for cosmetic treatments. Local workplace regulations must be observed. - Attention: Microneedling needle modules are sterile disposable products (consumables) and may only be used once! Individually packaged microneedling massage modules may also only be used once! - Microneedling needle modules may only be used in a sterile condition. Sterility is guaranteed only if the packaging is undamaged. - When inserting the microneedling needle module into the handpiece, care must be taken not to touch the front area (needle plate). During application as well, ensure that the needle module does not accidentally come into contact with contaminated objects, e.g., clothing. Contaminated microneedling needle modules must be replaced immediately. - Contact with freshly treated skin should generally be avoided. - Never touch the needle plate or needle tips while the handpiece is switched on – risk of injury! - In the idle state, the needle plate of the module must be fully retracted into the module. Defective needle modules must be replaced immediately and with special care – risk of injury! - Attention: Injury with a contaminated needle may result in the transmission of dangerous diseases. In such cases, a doctor must be consulted immediately. - Any consumables may only be used before their expiration date. Proper storage must be observed. - After the expiration date or after single use, microneedling needle modules must be disposed of as clinical waste in suitable special containers (safety box). Local disposal regulations must be observed. Under no circumstances should individual modules be disposed of in household waste (risk of infection to third parties)! - Contamination of the handpiece by backflow of cosmetic products must be checked regularly. If contamination occurs, operation must be stopped and an appropriate cleaning and disinfection procedure carried out (see technical operating manual). - The separate instructions on device disinfection must also be observed. |
|
What modules are there? |
|
BABOR microneedling uses sterilely packaged disposable modules for needling and hygienically packaged disposable modules for the final massage. The intensity of the application can be adjusted in a targeted manner via scaling on the handpiece. Penetration too deep into the skin with the needle module can be avoided by correct adjustment on the handpiece. The needle modules are equipped with a fillable tank into which the active ingredient serum can be added. This allows the handpiece to glide optimally on the skin. A special safety membrane in both modules prevents liquids from flowing back into the handpiece. Microneedling needle module – 12 needles per module - high-quality surgical steel - precise needle structure enables particularly clean punctures Microneedling massage module - high-quality plastic - supports active ingredient penetration after needling |
|
|
Attaching and removing the microneedling modules |
|
Immediately before use, the microneedling module is taken out of the packaging with gloved hands and placed on the switched off handpiece. The module is then rotated clockwise until a noticeable resistance marks the stop of the module in the handpiece. To remove the microneedling module, turn counterclockwise with the handpiece switched off. Care must be taken to ensure that any substance residues do not run into the handpiece. |
|
|
Frequency and intensity adjustment |
|
The BABOR microneedling treatment can be controlled via the following 2 parameters: Frequency The frequency reflects the number of vibrations of the module in the handpiece and is regulated via the display via the numerical values 1 to 10. |
|
Position1 |
= 60 oscillations per second |
||
|
Position5 |
= 65 oscillations per second |
||
|
Position8 |
= 75 oscillations per second |
||
|
Position10 |
= 105 oscillations per second |
|
Intensity Regulation via the handpiece Needle module: regulation of needle length 1. Insert the needle module into the handpiece. 2. Safe starting position: Turn the adjustment ring to the left until it can no longer be rotated. The needles are now deeply absorbed into the module. Then turn the adjustment ring to the right until it points to 1.3 – this is the gentlest setting. 3. Start your device. 4. By turning the adjustment ring to the right, the needle protrusion and thus the work intensity can be infinitely increased. Due to the arrow position on the ring, the intensity can be controlled at any time. If the mark points to 2 (complete rotation of the ring), the maximum intensity is reached with maximum needle protrusion. Please note the recommendations for needle protrusion and intensity according to the following table: |
|
Marking |
Needle protrusion |
Intensity |
|
|
0 – 1 |
none |
none |
|
|
1,3 |
small |
gentle |
|
|
1,7 |
medium |
medium |
|
|
2 |
maximum |
intense |
|
Massage module: Regulation of the strength of knocks 1. Insert the module into the handpiece. 2. Set the intensity on the handpiece to 1.3. 3. Start your device. 4. Adjust the intensity to the client’s comfort level after microneedling. Note: The higher the frequency and the higher the intensity, the more intense e the treatment result! |
|
Guideline values for setting frequency (speed) and intensity |
||||||
|
Needle module The following recruitment recommendations are always only standardized guideline values. If the skin reacts with bleeding at the selected setting, choose a gentler setting. |
||||||
|
|
|
|||||
|
Legend |
||||||
|
|
gentle |
1,3 |
||||
|
|
medium |
1,7 |
||||
|
|
intense |
2 |
||||
|
cheeks |
jaw strip / below chin |
chin |
mouth |
nasolabial wrinkles |
nose |
|
|
Frequency |
8 |
8 |
8 |
8 |
8 |
8 |
|
Intensity |
2 |
1,7 |
1,7 |
1,3 |
2 |
1,3 |
|
under eyes |
crow's feet |
upper eye area |
forehead incl. temples |
forehead wrinkles / glabella |
||
|
Frequency |
8 |
8 |
8 |
8 |
8 |
|
|
Intensity |
1,3 |
2 |
1,3 |
1,3 |
1,3 |
|
|
side areas of the neck, including side neck lines |
laryngeal / |
above / below collarbone |
décolleté |
breast fold |
||
|
Frequency |
8 |
8 |
8 |
8 |
8 |
|
|
Intensity |
2 |
1,3 |
1,7 |
2 |
2 |
|
4 APPLICATION METHOD
|
Massage module Adjust the massage intensity to the client’s perception after microneedling. Start with the gentlest setting on the cheek and ask which intensity is perceived as most comfortable. Important: Always treat the eye area with 1.3! |
||||||
|
gentle |
medium |
intense |
||||
|
Frequency |
8 |
8 |
8 |
|||
|
Intensity |
1,3 |
1,7 |
2 |
|||
|
Treatment technique with the needle module |
|
|
|
Positioning of the client The client’s head is positioned for each facial area in such a way that optimal work is possible. Handpiece guidance In principle, work is carried out in slow, concentrated strokes back and forth without pressure. The skin of the face should be slightly stretched between the index and middle finger of the other hand (V-grip) to ensure a good grip. On the forehead, stretch the skin more broadly between thumb and index finger. |
|
On the neck and décolleté, build skin tension by correct head positioning and shifting individual skin areas. Repeat strokes along the same line until the skin reacts with an even, intensive redness. For uniform treatment results, always guide the handpiece along the natural contour/curvature of the face. Take care on bony facial areas such as the forehead, cheekbone, chin, and jawline; if necessary, reduce the needle depth. Always treat each area consecutively on the left and right side to achieve a very even result. If possible: treat the right side with the right hand, the left side with the left hand. Deeper lines and wrinkles are then worked more intensively by guiding the handpiece in light zigzag movements along the fold. The device motor pauses automatically as soon as the handpiece is placed in the holder; this simplifies optimal positioning of the client when switching to other treatment areas. Once the handpiece is picked up again, the motor resumes, and treatment can continue. |
|
Attention: - Always work with a slight overlap to achieve an even result. - Always ensure the skin is supplied with sufficient active ingredient serum; never work on dry skin! |
|
|
What must be observed before placing the handpiece on the skin? |
|
1. Moisten the skin area to be treated with Moist & Firm Booster. 2. Start the device. 3. Make the appropriate settings. 4. Fill Moist & Firm Booster into the tank of the handpiece to ensure optimal gliding on the skin. |
|
|
Microneedling – Face |
|
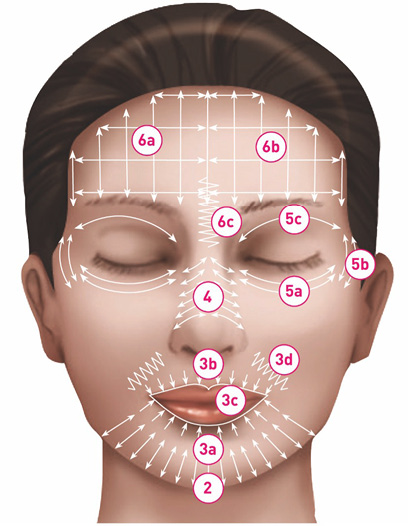
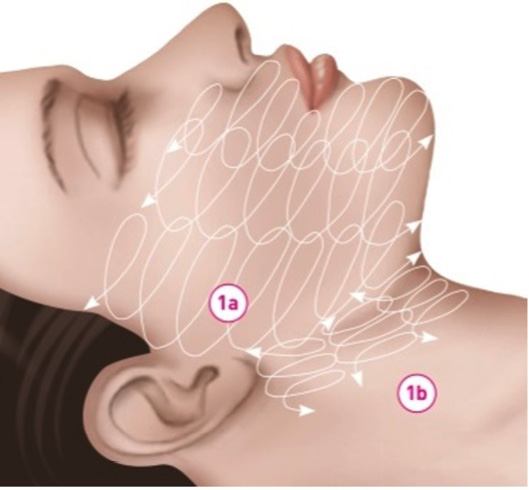
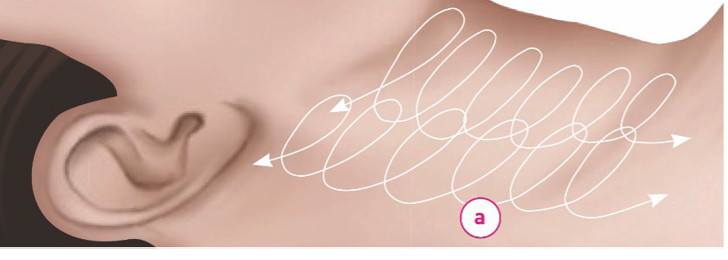
1. Cheeks a. Start on the side of the cheek below the ear and work in a stroke along the jaw ridge. Move the skin slightly upwards over the jaw ridge. b. Gradually work the cheek to the cheekbone below the eye or to the side of the nose. c. Treat the area next to the nose parallel to the bridge of the nose. d. Work the area below the jaw ridge and under the chin. To build up tension, move the skin down the neck. |
|
|
|
2. Chin |
|
Work in a line from the tip of the chin towards the mouth. |
|
|
3. Mouth |
|
Ask the client to roll her lips inward to create tension. If needed, place a finger gently over the lip area for protection. a. Area below the mouth: use stroke-like movements toward the lip line. b. Area above the mouth: use stroke-like movements toward the lip line. c. Trace lip contour in a strip at the top and bottom. d. Work out the nasolabial fold separately with slight zigzag movements of the handpiece along the fold. |
|
|
|
4. Nose |
|
Work on the side of the nose including the bridge and wings of the nose. |
|
|
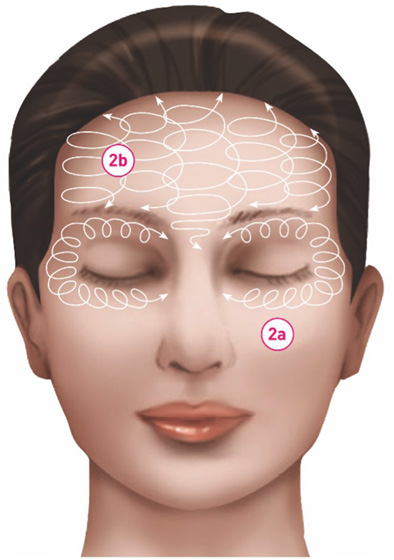
5. Eyes |
|
a. Under eye area: b. Crow's feet: Move in a semicircular path; the orbital rim serves as the boundary. c. Upper eye area: Shift the eyebrow upward and move in one stroke below the brow, connecting to the crow’s feet area. |
|
|
5. Forehead |
|
a. Stretch the skin vertically between thumb and index finger and treat the forehead with vertical stroke-like movements (include the temple area). b. Stretch the skin horizontally between thumb and index finger and treat the forehead with horizontal stroke-like movements. First one half of the forehead, then the other. c. Work forehead lines and glabella separately with light zigzag movements of the handpiece along the fold. |
|
Finally, check the overall result and re-treat skin areas that do not yet appear intensively activated. Additionally, depending on the treatment objective, re-treat selected problem zones/folds more intensively. |
4 APPLICATION METHOD
|
Treatment technique with the needle module |
|
|
|
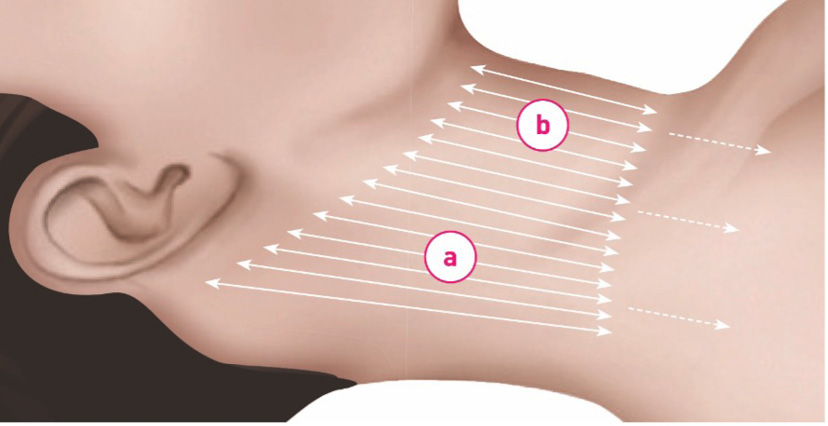
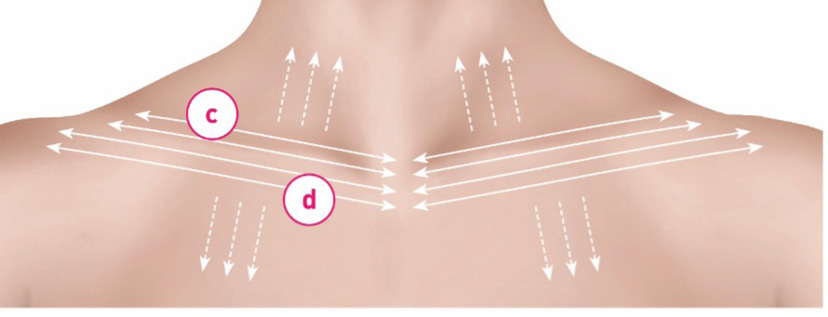
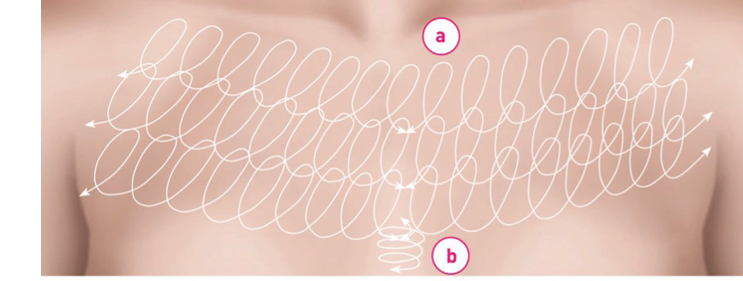
Microneedling – Neck incl. collarbone |
|
a. Place the client's head to the side and move the skin on the neck downwards by pulling with your free hand. Start at the side of the neck behind the head turn muscle and work up and down again in long strips to the larynx/thyroid area. b. To work the area above the larynx / thyroid gland, place the client's head in the middle and let the chin stretch slightly upwards. Stretch the skin downwards by pulling with your free hand and work up and down again in even paths. Caution: Do not apply pressure to the larynx! c. Put your head back on your side. Move the skin upwards and work the area above the collarbone with horizontal strips from the pit of the neck to above the trapezius. d. Then move the skin downwards and work the area below the collarbone from the middle to the shoulder joint with horizontal strips. e. Treat pronounced neck wrinkles more intensively with slight zigzag movements of the handpiece. Finally, check the overall result and post-process skin areas |
|
|
Finally, check the overall result and post-process skin areas |
|
|
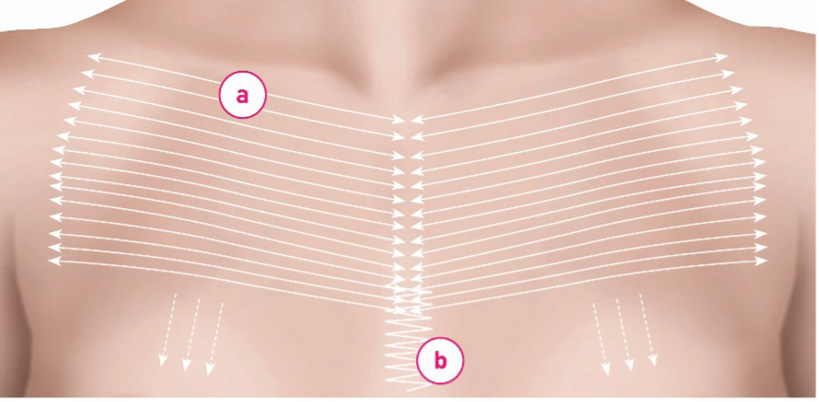
Microneedling – Décolleté |
|
a. Stretch the skin downwards by pulling it down and work the décolleté from the sternum in the middle in horizontal strips to the shoulder joint. Work from top to bottom to the base of the breast. b. Treat pronounced décolleté wrinkles and the breast fold more intensively with slight zigzag movements of the handpiece. |
|
|
Finally, check the overall result and post-process skin areas |
|
Treatment technique with the massage module |
|
Work on the areas previously processed with the microneedling needle module with spiral up and down movements. Slightly tighten the skin by shifting individual skin areas or build up additional skin tension by positioning the head correctly. Always treat each section directly one after the other on the left and right side. If possible: work on the right side with the right hand, left side with the left hand. |
|
|
Needling final massage – Face 1. Cheeks incl. chin and mouth area Work up and down again in spiral paths. |
|
a. Start on the side of the cheek below the ear and work the entire cheek up to the cheekbone. b. Work on the area under the jaw ridge and under the chin. |
|
|
|
2. Eyes and forehead |
|
a. Move the skin first downwards, then upwards to build tension. In the area of crow's feet, extend spiral movements if necessary. Work back the same way. b. Shift the skin upward at the hairline to create tension. Start laterally on the forehead above the eyebrows and work in spiral-shaped strokes toward the center of the forehead. Include the area of the glabellar line. |
|
|
|
3. Neck incl. collarbone |
|
a. Lay the client's head to the side. b. Move the skin on the neck upwards and perform spiral movements above the collarbone from the cervical fossa to the trapezius. c. Then move the skin on the neck downwards and perform spiral tracks below the collarbone in the same way.. |
|
|
|
4. Décolleté |
|
a. Stretch the skin downwards by pulling. Perform spiral movements from the sternum to the shoulder joint. b. If necessary, treat breast fold more intensively. |
|
|
Microneedling TREATMENT |
|
|
50 – 80 MINUTES (pure treatment time) |
|
|
Information & guidance |
Explain and give information sheets. Ask for contraindications and have them signed the formular. |
5 TREATMENT
|
As a rule, the following times are required for the pure microneedling application and the final needling massage: |
||
|
Microneedling |
Needling final massage |
|
|
Face |
15 – 20 minutes |
5 minutes |
|
Neck |
10 minutes |
2,5 minutes |
|
Décolleté |
10 minutes |
2,5 minutes |
|
Procedures |
||
|
Maximum results with treatments with microneedling can always be achieved by adhering to a complete series of treatments of approx. 6 treatments at intervals of 14-21 days each with suitable home care products. Of course, individual treatments, partial treatments or reduced treatment course are also possible. |
||
|
MICRODERMABRASION & MICRONEEDLING |
|
A moderately performed microdermabrasion immediately before microneedling can significantly enhance treatment results. By mechanically removing the uppermost stratum corneum with microdermabrasion, the skin’s absorption capacity can be considerably increased. In addition, skin resistance with regard to needle perforation is reduced; the needles can penetrate the upper stratum corneum more freely and deeply, thereby stimulating a maximum regeneration boost of the skin. This application requires an additional PROFESSIONAL Training! Performing Microdermabrasion & Microneedling All application and safety instructions as well as care and treatment plan recommendations remain valid when combining microneedling with a prior microdermabrasion, as described above. For all combinations of microdermabrasion and microneedling, the regimen of the MICRONEEDLING TREATMENT must be strictly followed in order to avoid skin overreactions. (see page x) The following must be observed: - Microdermabrasion is carried out very gently/moderately in preparation for microneedling in order to avoid skin redness and irritation as far as possible. - After microneedling, crystal residues must be completely and especially carefully removed to prevent crystals from being needled into the skin. We recommend using a magnifying lamp for verification. - Due to the preceding microdermabrasion, the stratum corneum—and thus the resistance at the skin surface—is reduced, so a lower needle penetration depth may need to be selected. |
6 Microneedling & DEVICES
|
60 – 90 MINUTES (pure treatment time) |
|
|
Information & guidance |
Explain and give information sheets. Ask for contraindications and have them signed the formular. |
|
PROTOCOL |
|||||||
|
Preparation |
Prepare warm (38 - 42°C) and cool (14 - 18°C) compress water. Add 2 HOT & COLD MASSAGE STICKS to the Cold Cabi or a very cold water bath before needling. |
||||||
|
Steps |
|
Expert Method |
Products |
Instructions for implementation |
|||
|
1. |
Grounding Ritual |
||||||
|
2. |
Deep Cleansing Ritual (Cleansing) |
5 |
|
|
BALANCING OINTMENT CLEANSER BARRIER RESILIENCE TONER |
||
|
3. |
Peeling |
10 |
Peeling Mask |
Apply thinly with a brush and let dry. Meanwhile: Scalp massage Then rub the mask dry with a cotton pad wrapped in gauze; remove any remaining residue with a damp sponge. |
|||
|
4. |
MDA |
||||||
|
Face |
10 |
||||||
|
Neck & décolleté |
10 |
||||||
|
Preparation |
Tonic (49,8%) |
Put on disposable gloves. Put the tonic on a cotton pad and rub the skin thoroughly. To protect the eyes. Hood and/or headband to protect the ears. |
|||||
|
Eye Protecting Pads |
|||||||
|
Application technique |
Ionic Crystals |
Intensity maximum: 1 - 2 Finally: Fan the remaining crystals dry with 2 facial tissues. Then clean thoroughly with damp sponges. There must be no more residual crystals on the skin! (Check with magnifying lamp) |
|||||
|
BARRIER RESILIENCE TONER |
|||||||
|
5. |
Microneedling |
||||||
|
Face |
15 - 20 |
||||||
|
Neck |
10 |
||||||
|
Décolleté |
10 |
||||||
|
Preparation |
Needle module |
Put on a face mask. Remove the needle module from the sterile packaging and place it on the handpiece. |
|||||
|
Application technique |
PRO MN Serum by |
Face: 8ml Neck & décolleté: 8ml Adjust frequency and intensity to the client and apply according to BABOR MN treatment technique. |
|||||
|
6. |
Mask |
10 |
VITAMIN B CALMING SHEET MASK |
|
8 minutes To enhance the cooling effect over the mask, perform COOLING Massage with the cool HOT & COLD MASSAGE STICKS. Remove the mask at the end. |
||
6 Microneedling & DEVICES
|
7. |
5 - 10 |
Massage module |
Remove the massage module from the packaging and place it on the handpiece. Adjust frequency and intensity to the client and perform massage in the same way as the treatment technique page 13/14. |
||||
|
8. |
Final care |
1 |
VITAMIN B CALMING SERUM ANTIOXIDANT BALM SPF 50+ |
||||
|
9. |
Reawakening Ritual |
||||||
6 Microneedling & DEVICES
|
MICRONEEDLING in combination with DEVICES |
|
The following overview shows how microneedling can be combined with other BABOR treatments and applications. For all BABOR DEVICE combinations, the special features of the respective technology must be taken into account for safe use. In addition, the recommendations with regard to the preparation of the skin for the respective device application as well as the sensible aftercare afterwards must be observed. Detailed information can be found in the respective DEVICE Guides. |
|
Manual treatment |
CleanFusion |
PolishFusion |
HydroFusion |
ImpulseFusion I |
ImpulseFusion II |
Ultrasound |
Microdermabrasion |
Microneedling |
SOFT & LOW PRO Acid Peels (4,5 – 10%) |
MEDIUM & HIGH PRO Acid Peels (14 – 20%) |
SkinFirmor RF |
|
|
Manual treatment |
|
|
|
|
|
|
|
X |
|
X |
|
|
|
CleanFusion |
|
|
|
|
|
|
X |
X |
|
X |
|
|
|
PolishFusion |
|
|
|
|
|
|
|
X |
|
X |
|
|
|
HydroFusion |
|
|
|
|
|
X |
|
X |
|
X |
X |
|
|
ImpulseFusion I |
|
|
|
|
|
|
|
X |
|
X |
X |
|
|
ImpulseFusion II |
|
|
|
|
|
|
X |
X |
|
X |
X |
|
|
Ultrasound |
|
|
|
|
|
|
|
X |
|
X |
|
|
|
Microdermabrasion |
|
X |
|
|
|
X |
|
!! |
!! |
!! |
|
|
|
Microneedling |
X |
X |
X |
X |
X |
X |
X |
!! |
X |
X |
X |
|
|
SOFT & LOW PRO Acid Peels (4,5 – 10%) |
|
|
|
|
|
|
|
!! |
X |
X |
|
|
|
MEDIUM & HIGH PRO Acid Peels (15 – 30 %) |
X |
X |
X |
X |
X |
X |
X |
!! |
X |
X |
X |
|
|
SkinFirmor RF |
|
|
|
X |
X |
X |
|
|
X |
|
X |
|
Legend |
||
|
|
possible |
* run PolishFusion to MDA |
|
X |
not possible |
|
|
!! |
only after professional Training |
|
|
Product name |
Description |
Container size |
|
Microneedling |
Sterile Metal Needles |
10 pieces |
|
Microneedling |
Plastic massage module (individually packaged hygienically) |
10 pieces |